ShinG3Genzo User Manual
日本語 | English
Learn how to select, develop, and export your photographs. New users should begin with Getting Started.
Contents
- Getting Started
- Image Browser
- Adjusting Brightness and Color
- SuperEdit and Keyboard Controls
- Layers, Masks, and Spot Repair
- Saving and Reusing Your Edits
- Exporting JPEG, PNG, TIFF, and HEIF
- Settings, Purchase, and Free Trial
- Troubleshooting
Find an operation
- Open and finish a photo: Getting Started
- Select photos from a burst: Image Browser
- Brighten only a face or sky: Layers and Masks
- Apply a finish to multiple photos: Saving and Reusing Edits
- Meet a contest's file-size limit: Export
- Resolve an unresponsive control: Troubleshooting
About this manual
English labels follow the app's English resources where available. Some browser controls still appear in Japanese; their Japanese labels are included where needed. Settings and toolbar customization may change names and positions. ⌘ means Command, ⌥ means Option, and ⇧ means Shift.
This manual covers the pre-release review build of ShinG3Genzo 1.0 (build 1). Text updated November 7, 2026. Check About ShinG3Genzo for the version of your installed app.
Requires macOS 26.5 or later. Generating AI selection masks and editing their points requires macOS 27 or later. RAW support varies by camera, macOS version, and selected decoder.
Read offline without an internet connection. Use ⌘F to find text on this page.
Choose Help → User Manual in the app to open the bundled HTML edition in your default browser. The initial page follows the app’s Japanese or English UI language. The text, screenshots, and included technical references are available offline. Links to external websites require an internet connection.
The browser, development, comparison, SuperEdit, and export screenshots show the English interface and were added on November 7, 2026. Controls and layout vary with settings and version, so also follow the instructions in each chapter.
Getting Started
ShinG3Genzo lets you browse, select, develop, and export RAW, JPEG, PNG, TIFF, and HEIF photographs as JPEG, PNG, TIFF, or HEIF files. Start with one photo to learn the basic workflow.
System requirements
Requires macOS 26.5 or later. Generating AI selection masks and editing their points requires macOS 27 or later; macOS 26.5 can display and apply saved mask images. RAW support varies by camera, macOS version, and selected decoder.
Startup window
Normal launch opens the Image Browser. Open a folder or choose Photos Library in the left panel, select a photo, and choose Develop. macOS window restoration may also reopen windows from the previous session.
Find your way around the development window
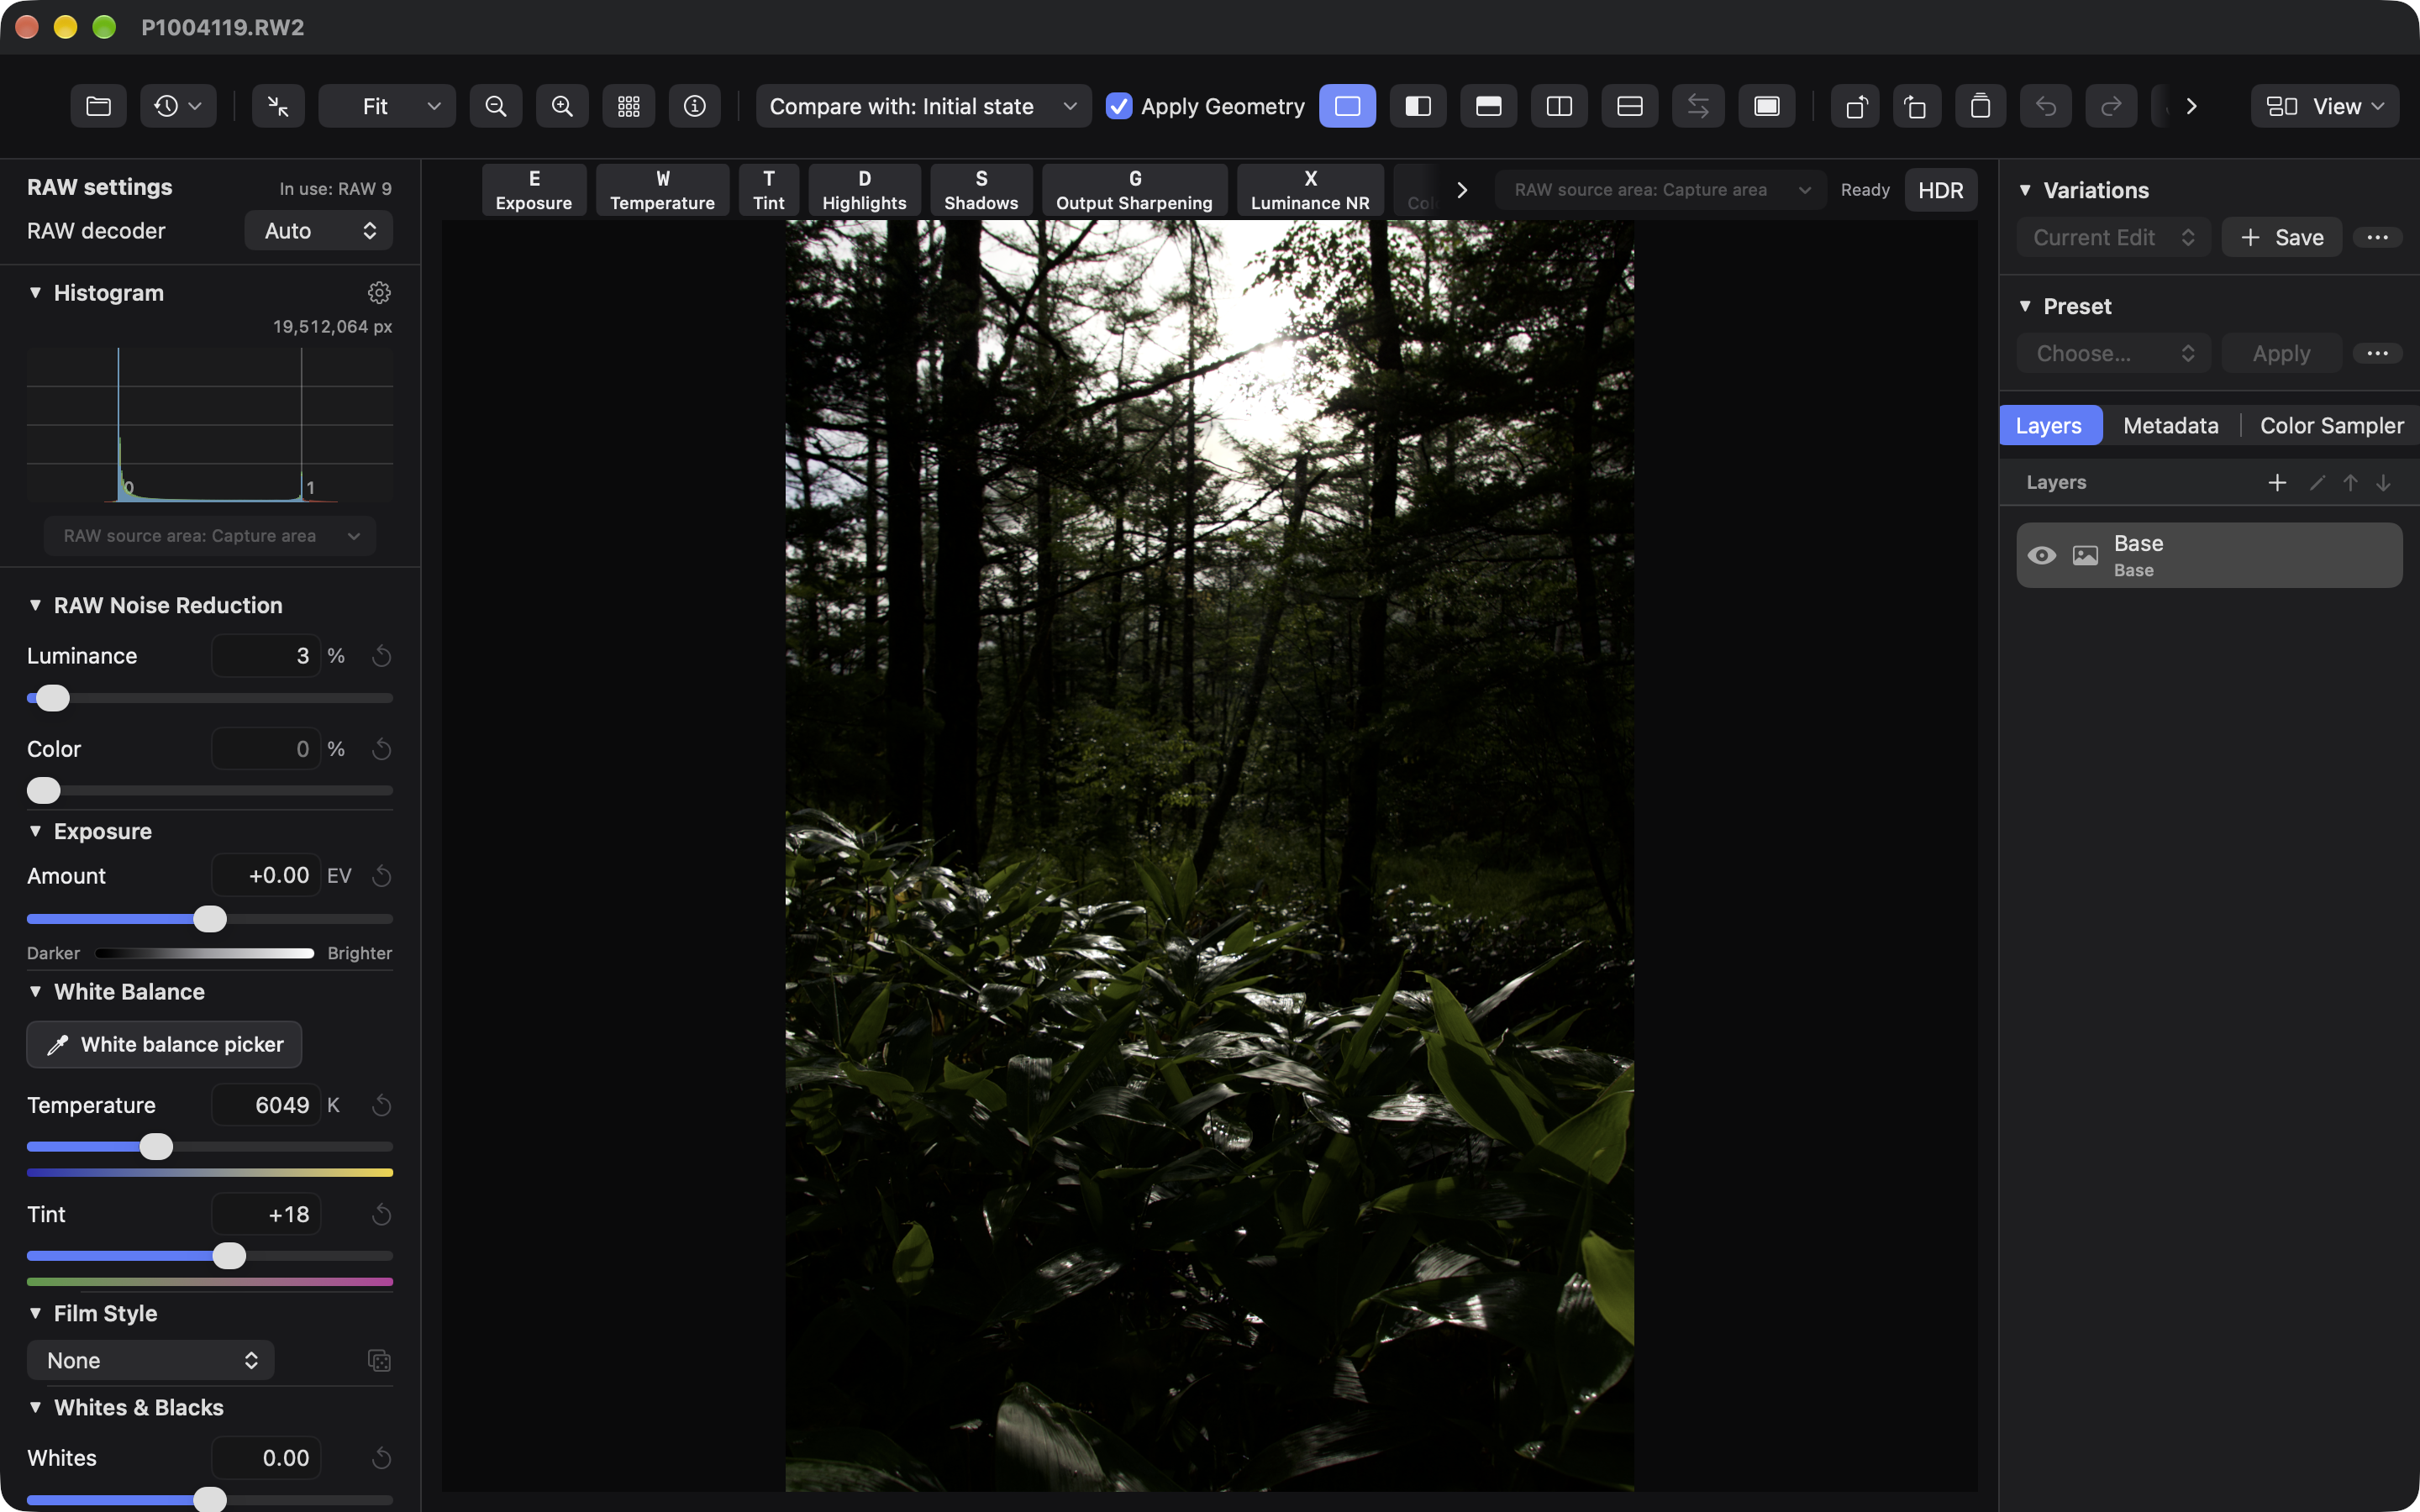
The left panel contains the histogram and development controls. The photo is in the center; layers, metadata, and color pickers are on the right. Use the top toolbar for comparison, saving, and export. The key tiles above the photo start SuperEdit. Visible controls depend on the window width and panel settings. This screenshot uses the English interface with the right panel visible.
Develop your first photo
- Select a photo in the browser and choose Develop. You can also use ⌘O to choose a file directly. Wait for the image to finish rendering.
- Select Base in the layer list. Adjust Exposure and White Balance.
- Refine the brightness using Highlights, Shadows, Whites, Blacks, and Tone Curve.
- If needed, add an adjustment layer and a mask to correct part of the image.
- Set the comparison source to “Initial state” and use a comparison view to check your changes.
- Save a variation for any finish you want to keep.
- Choose “Export image” to create a JPEG, PNG, TIFF, or HEIF file.
ShinG3Genzo does not rewrite the original image file. Your editing state is saved for each image. Saving edits and exporting a JPEG, PNG, TIFF, or HEIF are separate operations.
Supported rendered images
Alongside RAW, you can edit JPEG, PNG, RGB TIFF, and HEIF (HEIC/HEIF/HIF) in the same development window. TIFF supports single-page 8/16-bit integer and 32-bit floating-point images. JPEG and PNG must have no alpha channel; TIFF with alpha is accepted only when every pixel is opaque. HEIF supports opaque primary images. Transparent artwork and multiple frames/pages are outside the supported scope.
New edits preserve HDR for gain-map JPEG/HEIF and PQ/HLG HEIF. HDR display for PNG and floating-point TIFF is not supported. Exports default to SDR. For HDR output, select HEIF HDR (PQ); see Export. See HDR development for details.
Editing cannot recover tonal information absent from a JPEG or already clipped in the source. See the general-image specification (Japanese) for details.
Before adjusting an image
Select Base to adjust the whole image. If an adjustment layer is selected, you change that layer's settings instead.
Use ⌘Z to undo and ⇧⌘Z to redo. Double-click a slider, or click its reset button, to restore that setting to its default.
To select photos from a large collection, start with the Image Browser. To correct only part of a photo, see Layers, Masks, and Spot Repair.
Saving and exporting
Saving your editing state lets you continue adjusting the photo later. To create an image for another app, export it as JPEG, PNG, TIFF, or HEIF.
JPEG/PNG/TIFF/HEIF export requires an active free trial or a full-version purchase. Viewing, editing, and saving development settings remain available after the trial ends.
Settings
Open the app’s Settings window and choose a category on the left to show its controls on the right.
| Category | Controls |
|---|---|
| General | Display language and undo history limit |
| View | Development panel placement and preview speed priority |
| Develop | Default RAW source area and skin tone range |
| Keyboard | SuperEdit key assignments |
| Data Management | Thumbnail cache limit, usage, and clearing; reset the development database |
| License | Purchase status and access to the purchase and license window |
An edited undo history limit is also committed when switching categories. Resetting the development database requires closing all development windows and confirming the reset dialog.
In Data Management, Development Database shows the combined file size of development settings, saved variations, the legacy database, and SQLite companion files. It refreshes when shown, after a reset, or with the refresh button. Source images and thumbnail caches are excluded. Resetting records may not immediately shrink the files because SQLite can retain space for reuse.
Image Browser
The screenshots show the English interface. Folder names, album names, and other user content may appear in another language. Japanese labels are also included below where helpful.
Click a left-panel heading to collapse or expand File Types, RAW Pairs, Filter by Tags, Favorites, or Folders. In the photo library, Filter by Tags and Photos & Albums can be collapsed. All sections start expanded, and their state persists across launches. Collapsing a section does not change filters, pair settings, or the selected folder or album. The folder/photo-library source selector remains visible.
Open a folder and select photos
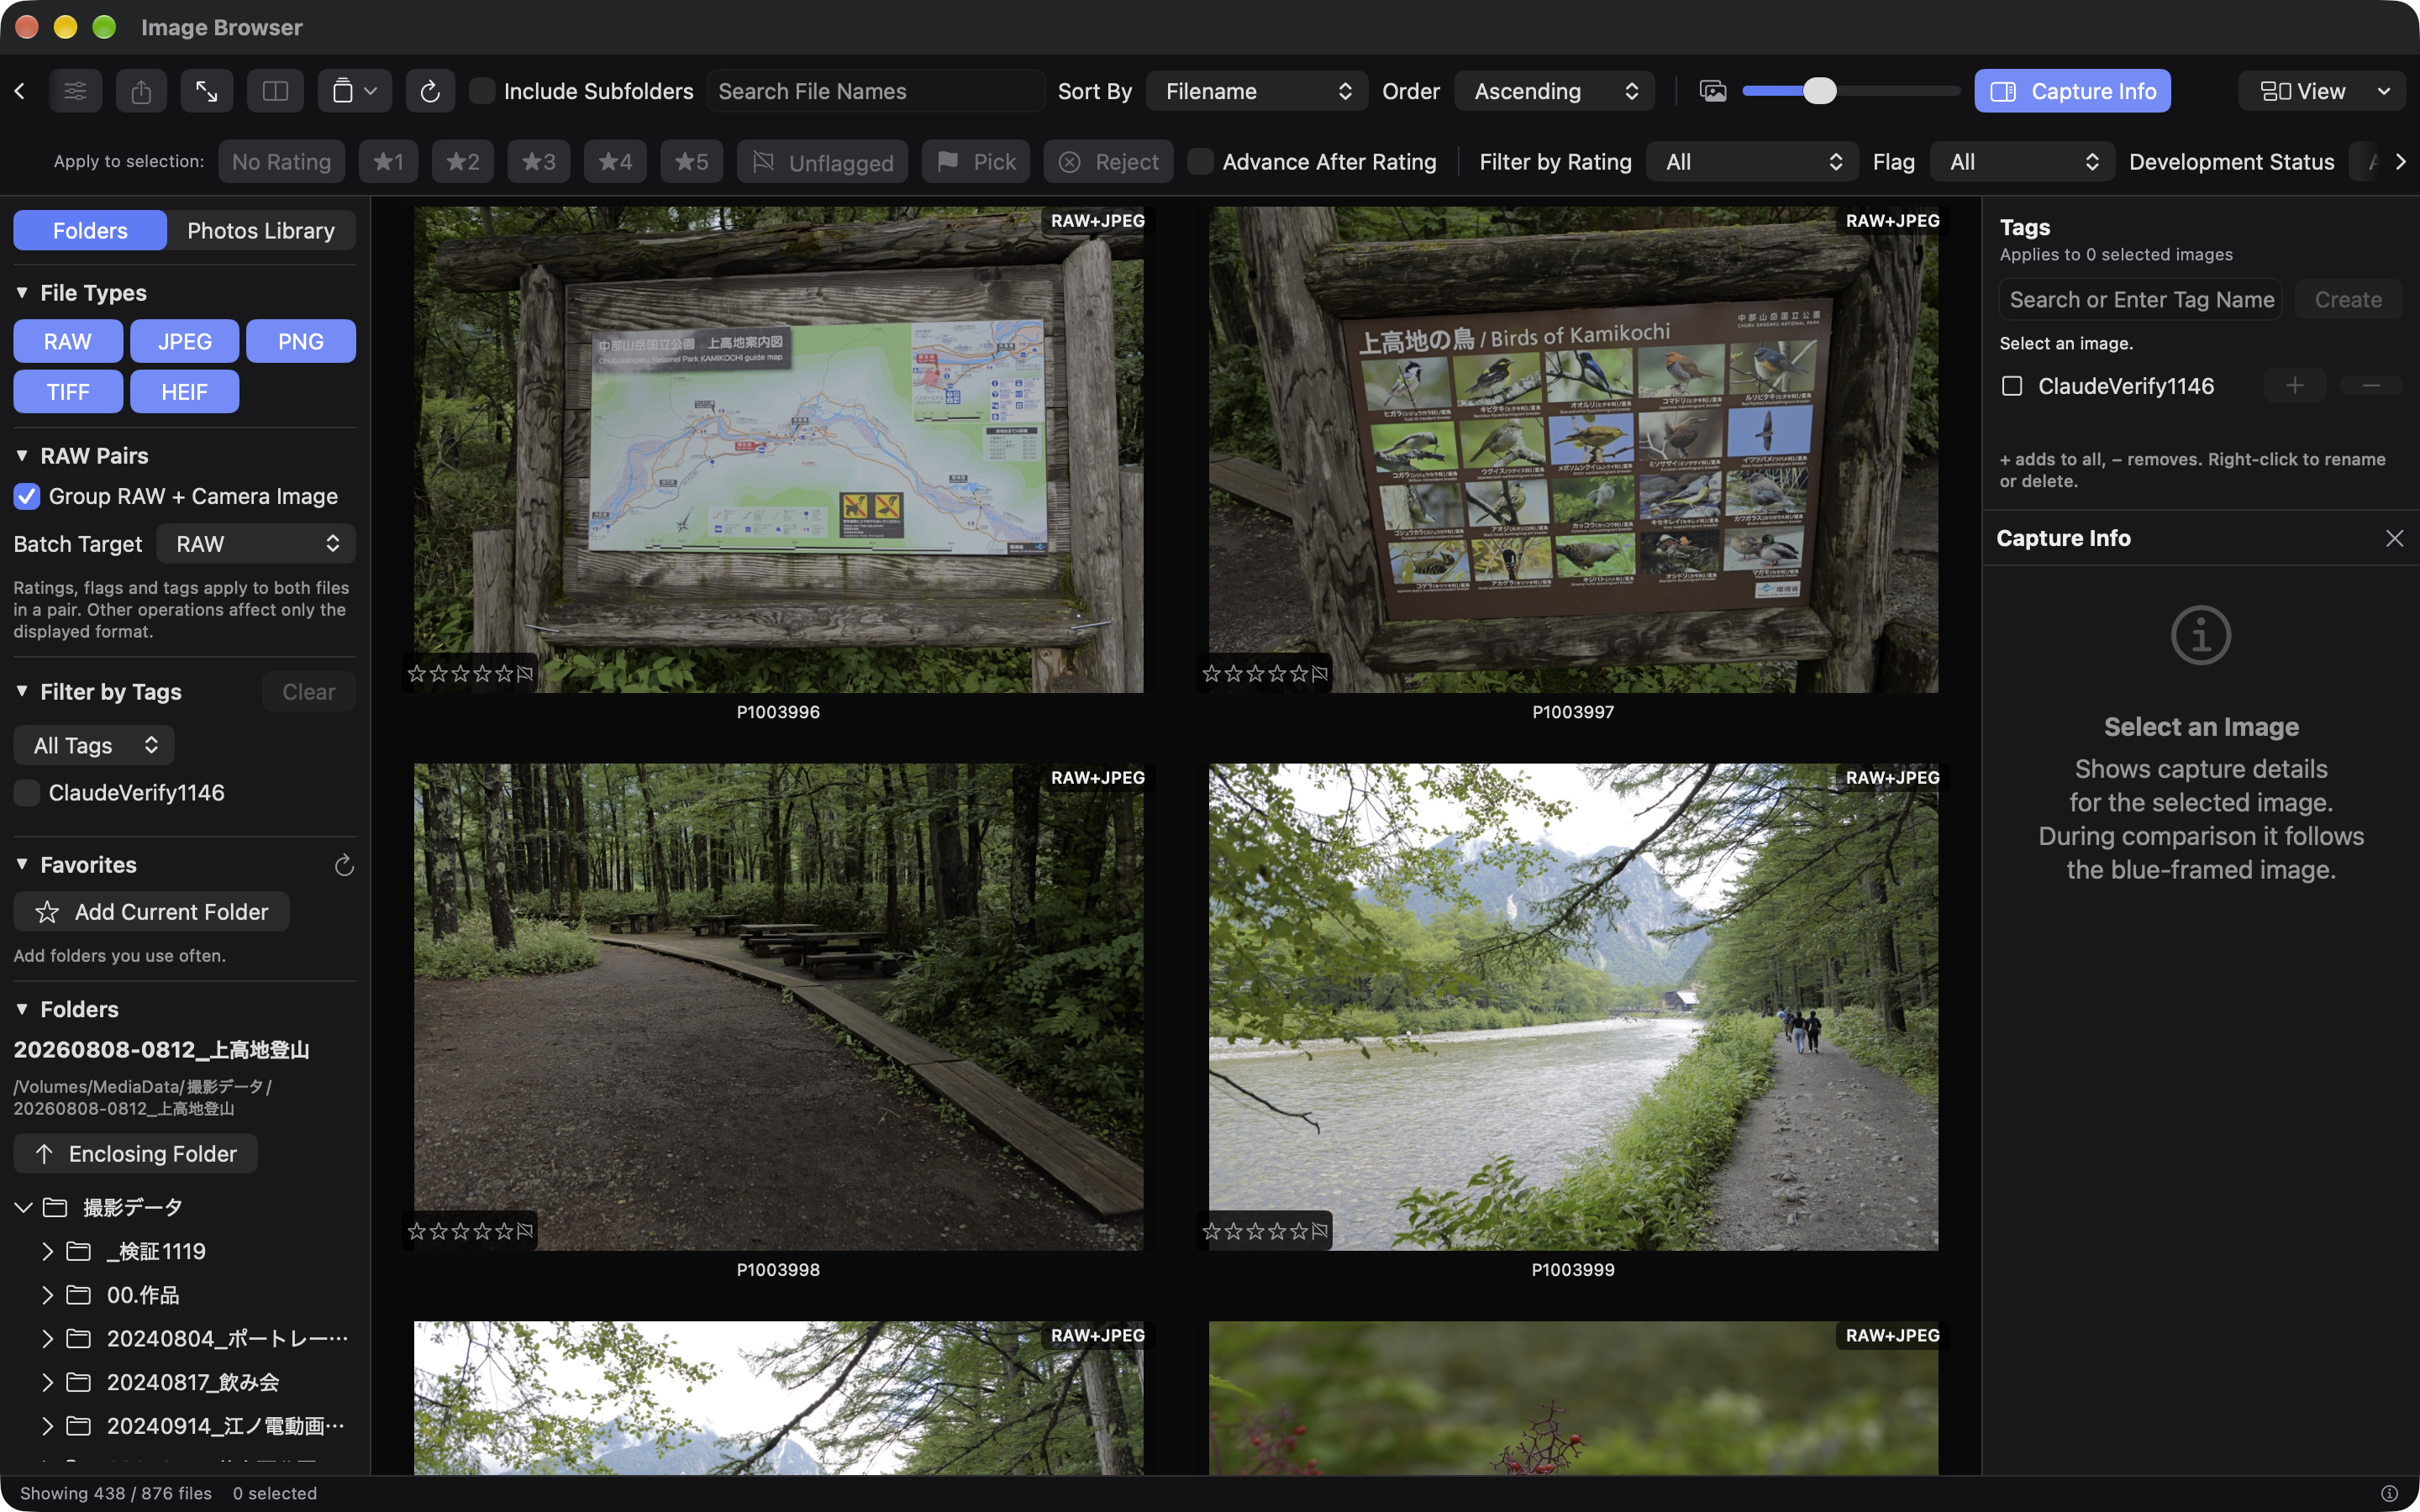
- The Image Browser opens on normal launch. To reopen it, choose “Image Browser…” from the File menu or press ⇧⌘B.
- Click the open-folder button (フォルダを開く…) and choose a folder containing RAW, JPEG, PNG, TIFF, or HEIF files. Enable the include-subfolders option (サブフォルダも含める) to include nested folders.
- Check the loading indicator and the count at the bottom. Large folders can take time to populate.
- Click a thumbnail or filename to select a photo.
Use the folder list in the left panel to move between folders. Register the current folder as a favorite (現在のフォルダを登録) to reopen it from Favorites. If an external drive is missing, check its connection. If a folder cannot be read, select it again with the open-folder button.
Filter by file format
Use the independent RAW, JPEG, PNG, TIFF, and HEIF toggles at the top of the left sidebar. All are on by default and survive app restarts. Turning all off makes the grid empty. Format filters combine with filename, rating, flag, tag, and development-status filters.
Check any warning shown on a thumbnail. Alpha PNGs, multipage TIFFs, and unsupported TIFF sample layouts may appear in the grid but cannot be developed. The opaque-TIFF notice means transparency will be checked when opening the image. Passing the metadata check does not rule out damaged pixel data or later decoding errors.
For rendered images, “Original image” shows the source without saved development edits. RAW-only views use “Camera image.” RAW source-area menus are not shown for rendered images.
Thumbnails have a single filename line below the image; paired names omit the extension. Ratings and flags sit over the bottom of the image. These controls remain visible on all images, including unrated and unflagged images, regardless of hover or selection. Pairs show “RAW+JPEG” or “RAW+HEIF” at the top right and warning icons appear at the bottom right. Hover over the warning icon to see its reason; the rest of the thumbnail has no tooltip. The filmstrip uses the same layout, with a blue outline for the active image and a dashed orange outline for the fixed comparison image.
Browse and develop HEIF images
HEIC, HEIF, and HIF files support thumbnails, enlarged previews, and comparison. The independent HEIF toggle survives restarts. The primary image is displayed; thumbnails remain SDR, while enlarged previews and comparison support HDR as described below. Auxiliary images are not listed separately. Original files and gain maps remain unchanged.
Double-click HEIF to open the common development workspace, with shared panels, SuperEdit, saved edits, settings transfer, presets, reset, and batch operations. New edits preserve HDR in gain-map HEIF/JPEG and PQ/HLG HEIF. Existing SDR edits retain their previous interpretation. Normal JPEG/PNG/TIFF/HEIF exports convert HDR to SDR; 32-bit float TIFF retains extended values. HEIF output supports opaque 8/10-bit SDR or 10-bit HDR (PQ), with a .heic extension. Gain maps are not generated. Alpha images and sequences are excluded. Codec availability depends on the OS.
Browse HDR originals
The browser supports gain-map HEIF/JPEG and PQ/HLG HEIF originals. Grid and filmstrip thumbnails remain SDR and show an HDR badge at the top right, alongside the pair badge when applicable. A 10-bit SDR HEIF is not marked HDR.
“HDR display” in enlarged previews and two-image comparison enables HDR brightness on a compatible display. Turn it off for SDR presentation. Both views share this setting, which survives restarts. The two comparison panes use the same setting. macOS adapts brightness to the current display, including SDR displays. Switching does not change zoom, pan, selection, or development settings.
Use Original image or a pair's camera-original view to see HDR. Saved developed browser previews are SDR, with HDR edits tone-mapped for display. The development workspace retains HDR for editing and comparison. For HDR output, select HEIF HDR (PQ) in the export panel. HDR PNG and a float-TIFF HDR display mode remain unsupported.
Pair RAW with camera JPEG or HEIF
Enable “RAW+カメラ現像をまとめる” in the left sidebar to show a RAW and one camera JPEG or HEIF with the same basename in the same folder as one photo. Pairing starts off and the preference survives restarts, including the previous RAW+JPEG preference. Matching ignores filename case. A RAW with both JPEG and HEIF, duplicate candidates, and files belonging to different existing stacks remain separate.
- Grid and filmstrip pairs show “RAW+JPEG” or “RAW+HEIF” at the top right and prefer the most recently saved edit from the RAW or JPEG/HEIF member. Without saved edits, they show the camera JPEG/HEIF. The camera-original view in enlarged previews and comparison shows the source without saved development settings.
- Enlarged and comparison views switch between camera image (カメラ現像) and developed RAW (RAW現像). The pair switch applies to both comparison panes; independent images retain their existing source switch.
- Double-click or “現像(RAW優先)” develops RAW. Choose “JPEGを現像” or “HEIFを現像” from the development or context menu to edit the camera image. Each file retains independent saved edits.
- Ratings, pick flags, and tag changes apply to both members. Existing differences show a warning icon; viewing never reconciles them. The camera image supplies the representative rating. Unrelated tags remain intact.
- Choose RAW, camera image (カメラ現像), or both (両方) under “一括操作の対象” for paste, reset, presets, and batch export. The initial target is RAW. Independent images always target their own file. Copy requires one selected photo and uses RAW when both is selected; its tooltip names the source.
- A pair matches filters when either member satisfies the combined filename, rating, flag, tag, and development conditions. Disabling a format limits both display and operations to the remaining visible file.
- Burst stacks remain separate from pairs. Creating a stack from several paired photos includes both files of each pair.
Turning pairing off restores independent file display. Pairing alone changes neither source files nor saved edits. The footer distinguishes displayed photos from physical files.
The batch target selects RAW, the camera JPEG/HEIF, or both for development settings and export. Camera-image previews continue to show the original even after editing. Hiding RAW through the format filter prevents operations on that RAW. Hiding a candidate format does not resolve an ambiguous RAW+JPEG+HEIF group.
Grid display and multiple selection
- Use the slider beside the image icon in the toolbar to change thumbnail width from 120 to 1024.
- Search filenames in the search field (ファイル名で検索). Sort by filename, capture date, modification date, or file size, in ascending or descending order. Images with unknown capture dates appear last when sorting by capture date.
- ⌘-click adds or removes individual images from the selection. ⇧-click selects a range.
- With the grid focused, use arrow keys to move the selection, ⇧ plus arrow keys to extend it, ⌘A to select all, and Esc to clear it.
- Use the display menu beside the toolbar to show or hide the left and right panels. The toolbar scrolls horizontally; its end arrows reveal hidden controls.
- Drag panel dividers to resize the panels. Thumbnail size, panel widths, and visibility are restored after restarting the app.
The display menu stays outside the scrolling toolbar, so you can restore hidden panels at any time.
Ratings and flags
Click a star over the bottom of an image to rate that photo. Clicking its current rating again clears the rating. Clicking stars directly affects only that photo, even when several images are selected.
To rate the entire selection, use the toolbar's no-rating control (評価なし), ★1–★5, or flag controls: unmarked (未判定), pick (採用), and reject (除外). Ratings and flags are also available in the grid's context menu.
| Key | Action |
|---|---|
| 0 | Clear rating |
| 1–5 | Assign one to five stars |
| P | Pick |
| X | Reject |
| U | Unmarked |
These actions affect selected images in the grid, the displayed image in large preview, or the blue-bordered image in two-image comparison. If you are typing in a text field, return focus to the grid or preview first.
Enable advance-after-rating (評価後に次へ) to move to the next image after saving a rating or flag. Use the rating filter (評価で絞り込み) and flag filter (フラグ) to narrow the list. Choose the all option (すべて) to remove each filter.
Tags and tag filters
- Select images and enter a name in the right panel's tag search field (タグ名・候補を検索).
- Click the add button (追加). The tag is applied to the selection; a new name also creates a tag.
- Use + beside an existing tag to add it to every selected image, or − to remove it. The partial-selection indication (一部に設定) means that only some selected photos have the tag.
- Choose tags in the left panel's tag filter (タグで絞り込み). Match all selected tags (すべて含む) or any selected tag (いずれか含む).
Right-click a tag in the right panel to rename or delete it. Deleting a tag (タグを削除) removes its definition and removes it from every image. Use − to remove it only from selected images.
In large preview, tags apply to the displayed image. In two-image comparison, they apply to the blue-bordered image. Clear the tag filter with the left panel's clear button (解除).
Filter by development status
Choose All, Developed, or Undeveloped in “Development Status,” beside the rating and flag filters. Combine this with filename, rating, flag, and tag filters. The default is All; this selection is not retained after closing the screen.
Development status means that the image has a latest saved set of development settings. It does not depend on whether a developed thumbnail exists or a camera preview is displayed. Resetting only the thumbnail does not change development status. An image with saved variations but no latest saved settings is Undeveloped. Settings saved at their default values still count as Developed.
Status is read in the background when you open a folder. While loading, images with unknown status are excluded from both Developed and Undeveloped; All continues to show them. Status updates after saving, pasting, applying a preset, resetting, or undoing/redoing those changes. Images may leave a filtered list when their status changes, but a batch operation's targets remain fixed during the operation.
Large preview and two-image comparison
Select a photo and click the large-preview button (拡大プレビュー), or press Space. Move between photos with the previous/next controls (前へ/次へ), the left/right arrows, or the bottom filmstrip.
- Fit shows the whole image; 100% is useful for checking detail. Pinch to zoom and scroll to pan.
- “Developed” applies the last saved development settings. If none exist, it shows the camera image.
- “Camera image” does not apply saved development settings. It follows the current RAW source area, so it is not always restricted to the capture area.
- Click the grid/list control (一覧), or press Space or Esc, to return to the grid. The grid restores the scroll position from before you opened preview, even if you moved to another photo in preview.
Select two photos and click the two-image comparison button (2枚比較) to display them side by side. Change the active, blue-bordered side using its left/right selector (操作対象), by clicking the image, or with Tab. Previous/next, arrow keys, and the filmstrip change the active side's image. Fit/100%, zoom, and pan are linked between both images.
Ratings, flags, tags, and capture information follow the active side. Return with the list control, Space, or Esc. This compares different photos; the development window's comparison tools compare editing states of one photo.
Open the development window
Select an image and click “Develop,” press Return, or double-click its image or filename in the grid.
With “Open in a new development window” off, the browser reuses its development window. With it on, a new window opens. If that photo is already open, the app activates its existing window.
Saved development results update the browser thumbnail. Browsing the grid does not write corrections into the original image.
Group bursts into stacks
Manual stacks
Select several images and choose “Stacks” → “Group into a stack,” or use the matching context-menu command. A collapsed stack shows its representative image and image count. Click the count to expand or collapse it.
Right-click an expanded member and choose “Set as representative” to change the cover image. “Ungroup stack” removes the grouping without deleting source images. “Expand all stacks” and “Collapse all stacks” are also available.
Automatic stacks
- Choose “Stacks” → “Auto Stack…”.
- Set the capture interval and minimum number of images. Defaults are two seconds and two images.
- Check the proposed stack and image counts, then click “Create.”
Only unstacked images matching the current filters are considered. Photos must be from the same camera and folder, with capture intervals within the selected limit. Photos with unknown capture dates or cameras, and existing stack members, are excluded. This does not compare visual similarity. The first image becomes the representative, which you can change afterward.
Check the RAW source area
Supported images show a “Capture area” or “Full area” badge at the bottom right of the thumbnail. Badges appear only where supported area differences exist. They are indicators, not toggle buttons.
- Grid: right-click and choose “RAW source area.” If the clicked image belongs to the selection, the change applies to selected supported images.
- Large preview: use “RAW source area” on the filename row.
- Two-image comparison: use the menu near each image's filename to change that image's area.
For the full area, enable “Show capture area outline” to display a yellow dashed outline. The default is the capture area. Per-image choices survive app restarts; app settings set the default for images without a choice.
Full-area extraction is limited to supported RW2 files. Changing the area changes the apparent size of subjects. See Adjusting Brightness and Color for its effects on positional corrections.
Thumbnails and file actions
The grid prefers saved developed thumbnails. If none exist, it shows a camera preview. Preview-source labels and thumbnail tooltips are not displayed. Paired grid and filmstrip thumbnails prefer the most recently saved RAW/JPEG/HEIF edit, then the camera JPEG/HEIF, then undeveloped RAW. Missing developed thumbnails are regenerated from saved settings. Resetting one member reveals the remaining edit. Legacy edits use the developed-thumbnail modification date when their save date is unknown; RAW wins ties or two unknown dates. The camera/RAW source switch for enlarged and comparison views remains independent.
| Context-menu command | Action |
|---|---|
| Reset Thumbnail | Restore the camera thumbnail without deleting source images, saved development settings, or variations |
| Show in Finder | Reveal the original image file in Finder |
After resetting a thumbnail, “Developed” in large preview still uses saved settings. Resetting the thumbnail is separate from resetting development settings.
Open Settings → Data Management → Thumbnail Cache to view its limit, usage, and location or clear the cache. These controls have moved out of the browser popover. Choose a limit of 256 MB, 512 MB, 1 GB, or 2 GB; the default is 512 MB. This cache speeds up display and is separate from source images and development settings.
Browse the Photos library
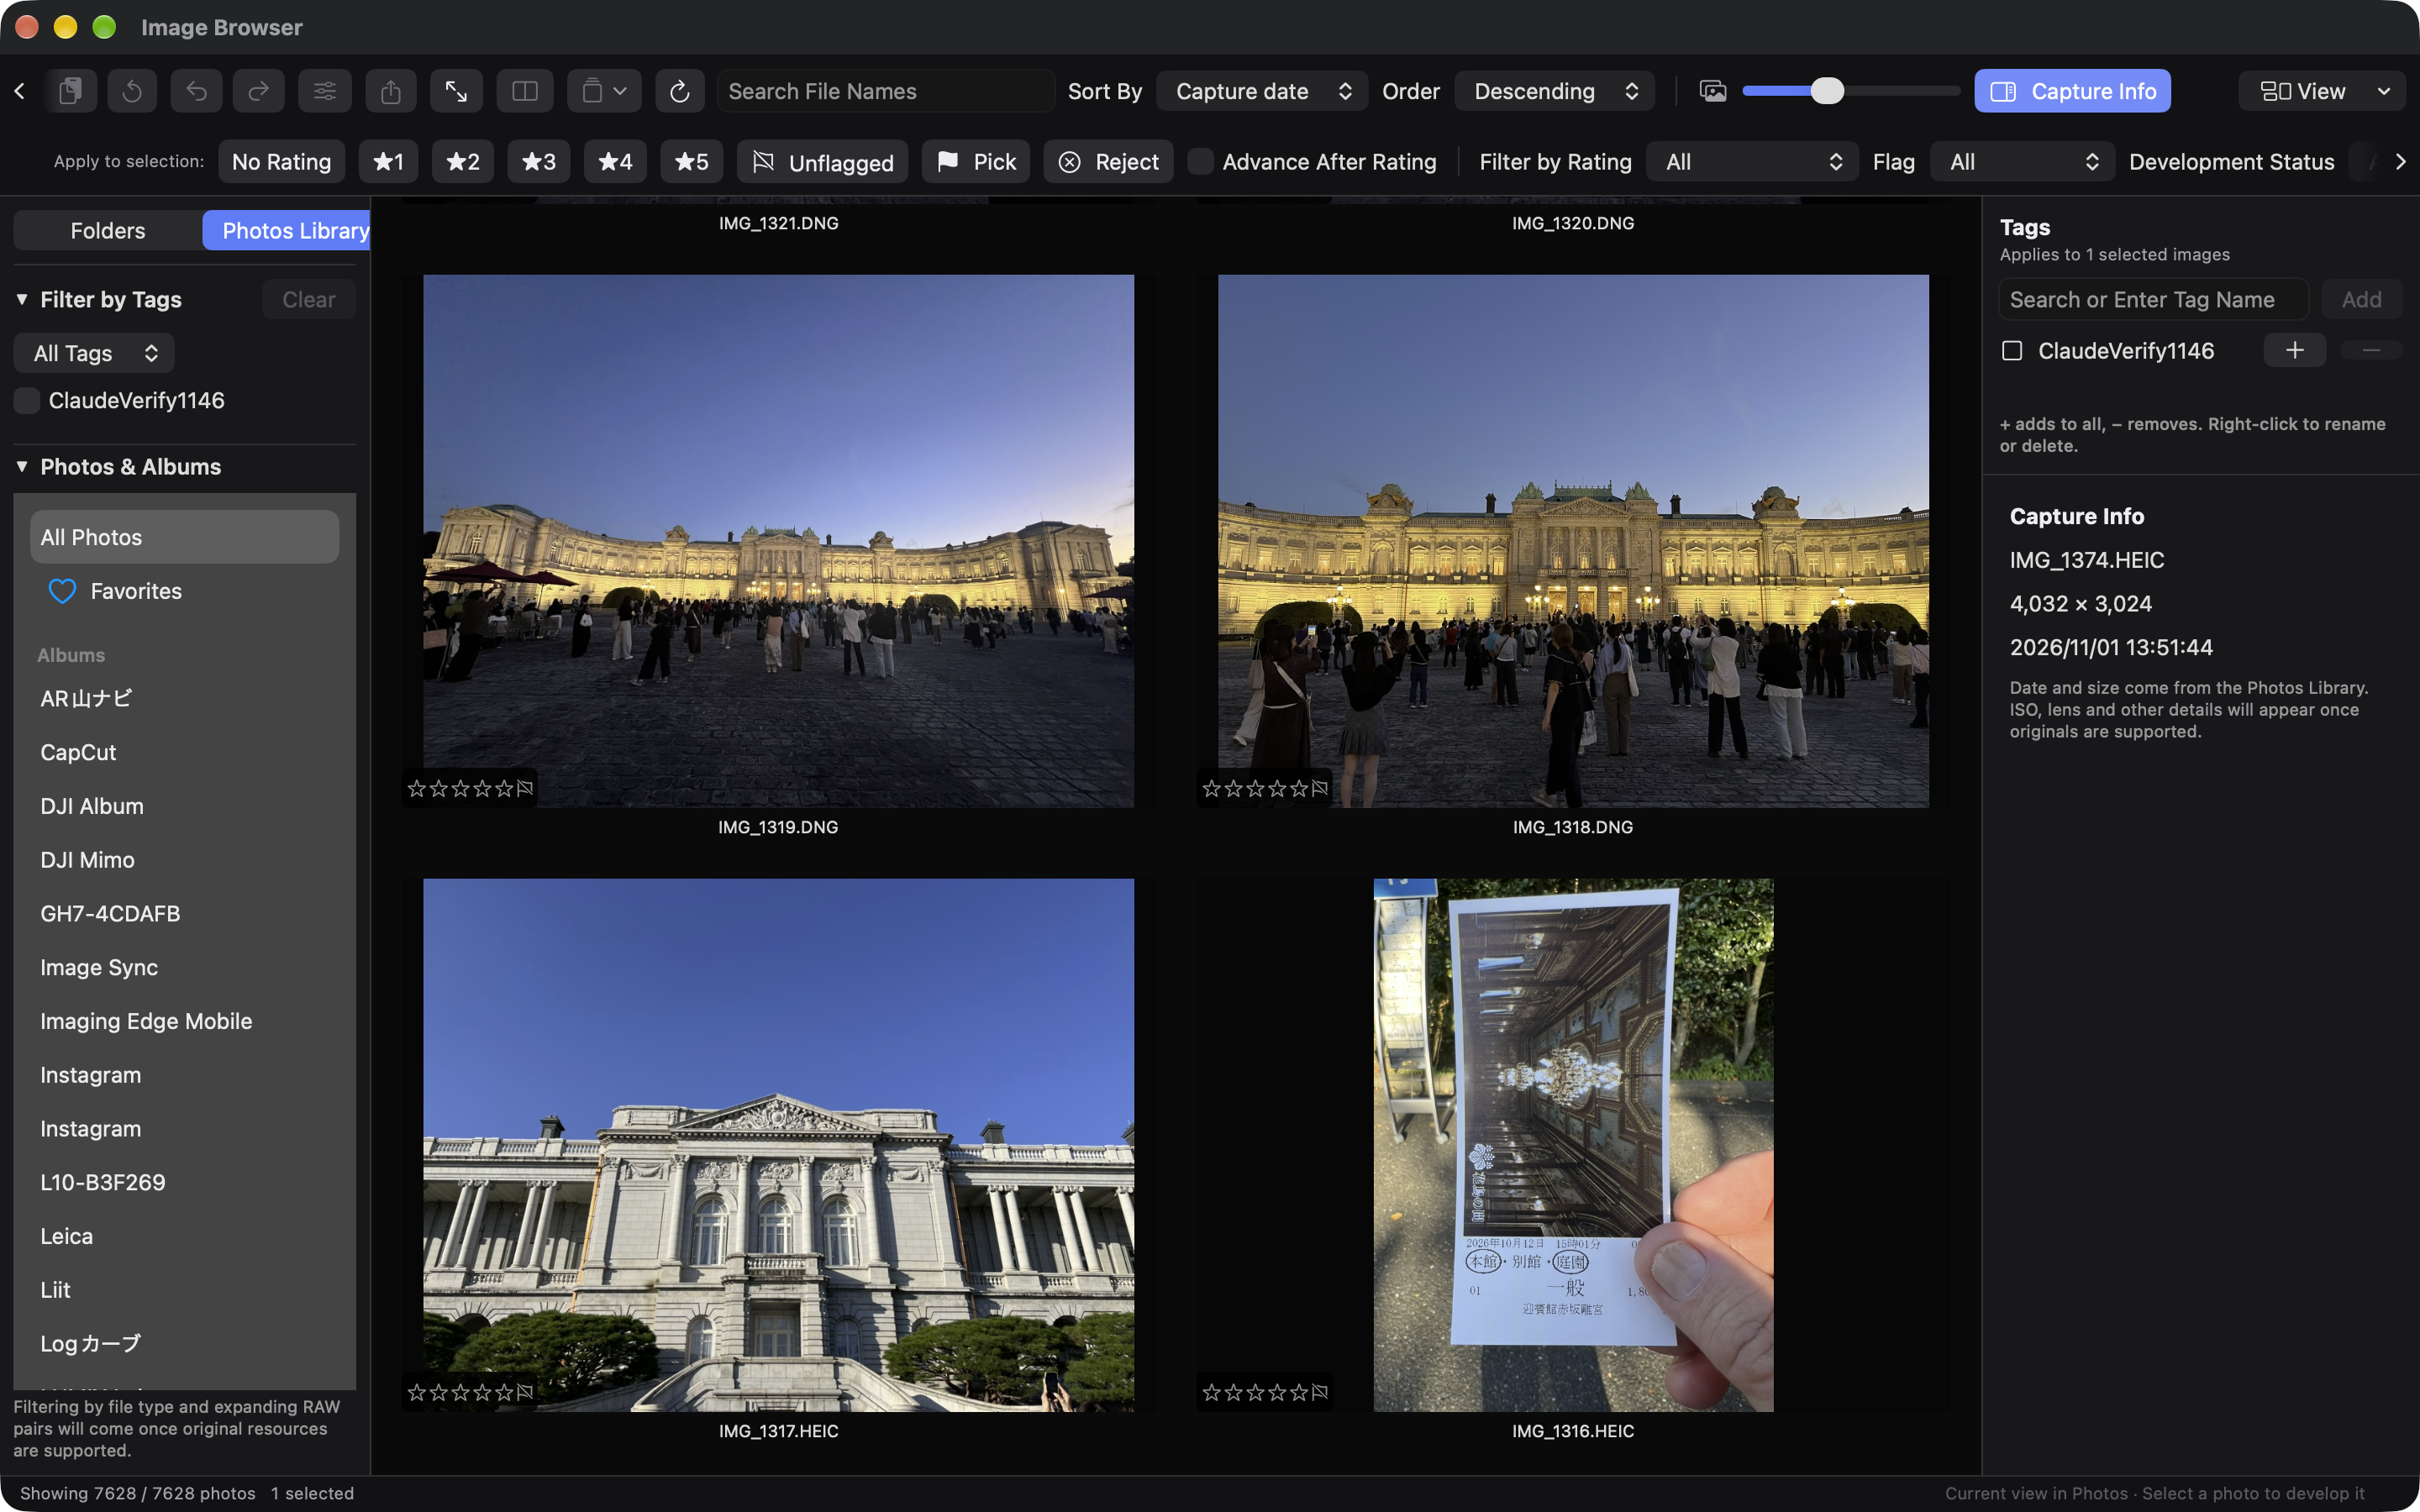
Switch between フォルダ and 写真ライブラリ at the top of the left panel. Both sources share the browser toolbar, side panels and thumbnail size. Grant Photos access on first use. This accesses the macOS System Photo Library.
Choose All Photos, Photos favorites or an album. Filename search, capture-date/name sorting and ascending/descending order cover the entire collection. Large libraries may take time to index; this reads metadata, not every original image.
Click to select, use Command/Shift for multiple selection, arrow keys to move, and Command+A to select all matching images. Double-click, Space or 拡大プレビュー opens the shared in-browser preview. Use Fit/100%, pinch and scroll, previous/next and the filmstrip. Select two or more images and choose 2枚比較 for synchronized zoom and pan. Switch the active side with Tab; Space/Escape returns to the grid.
Previews show the current appearance in Photos, not the unedited original or a ShinG3Genzo development result. iCloud previews may require network access. Obsolete image requests are cancelled when leaving a view. Library changes update the catalog. The right panel displays the library's date, dimensions and favorite status.
Ratings, pick/reject flags and tags use the same controls as folder images. Ratings and flags stay visible in the grid and filmstrip. Use 0–5 for ratings and P/X/U for flags. Multiple selection applies changes to the selected photos; comparison targets only the active blue pane. Advance after assessment and rating/flag/tag filters are supported.
Annotations are stored locally by ShinG3Genzo. They follow the same photo across albums and app restarts, independently of downloaded preview files. Photos favorites and keywords are not modified. Multiple original resources inside one Photos asset share the photo-level annotations. Tag definitions are shared with the folder browser, so renaming or deleting a tag affects both sources; image assignments remain separate.
Use Develop in the toolbar or context menu to open the selected photo. Choose an unedited RAW, JPEG, HEIF, PNG or TIFF resource, then open it in the development workspace. When a photo contains both RAW and JPEG/HEIF, choose which original to develop. “Allow network access to retrieve originals” is enabled by default, and your choice is remembered. Local originals are used when available; cloud originals are downloaded when needed. Acquisition shows progress and supports cancellation.
Development uses the same workspace as folder images, including the new-window option. Edits, variations and RAW usage ranges are saved per original in ShinG3Genzo and restored when you reopen that original from the library. Changed original content is treated as a separate editing source; previous settings are not applied automatically. Successfully opened originals appear in Recent Files with a Photos Library label. Use the menu bar or workspace history to reacquire the same original, including after restarting the app. Failed acquisitions can be retried or removed from history. If the original content changed, confirm the notice before opening it. Clear History clears both file and library history without deleting saved edits or photos.
Stacks, format filters and RAW-pair expansion, batch development/export, original-based HDR viewing in the browser and developed browser thumbnails remain later phases. The development workspace uses its existing HDR support. Originals and albums are not modified.
Culling mode
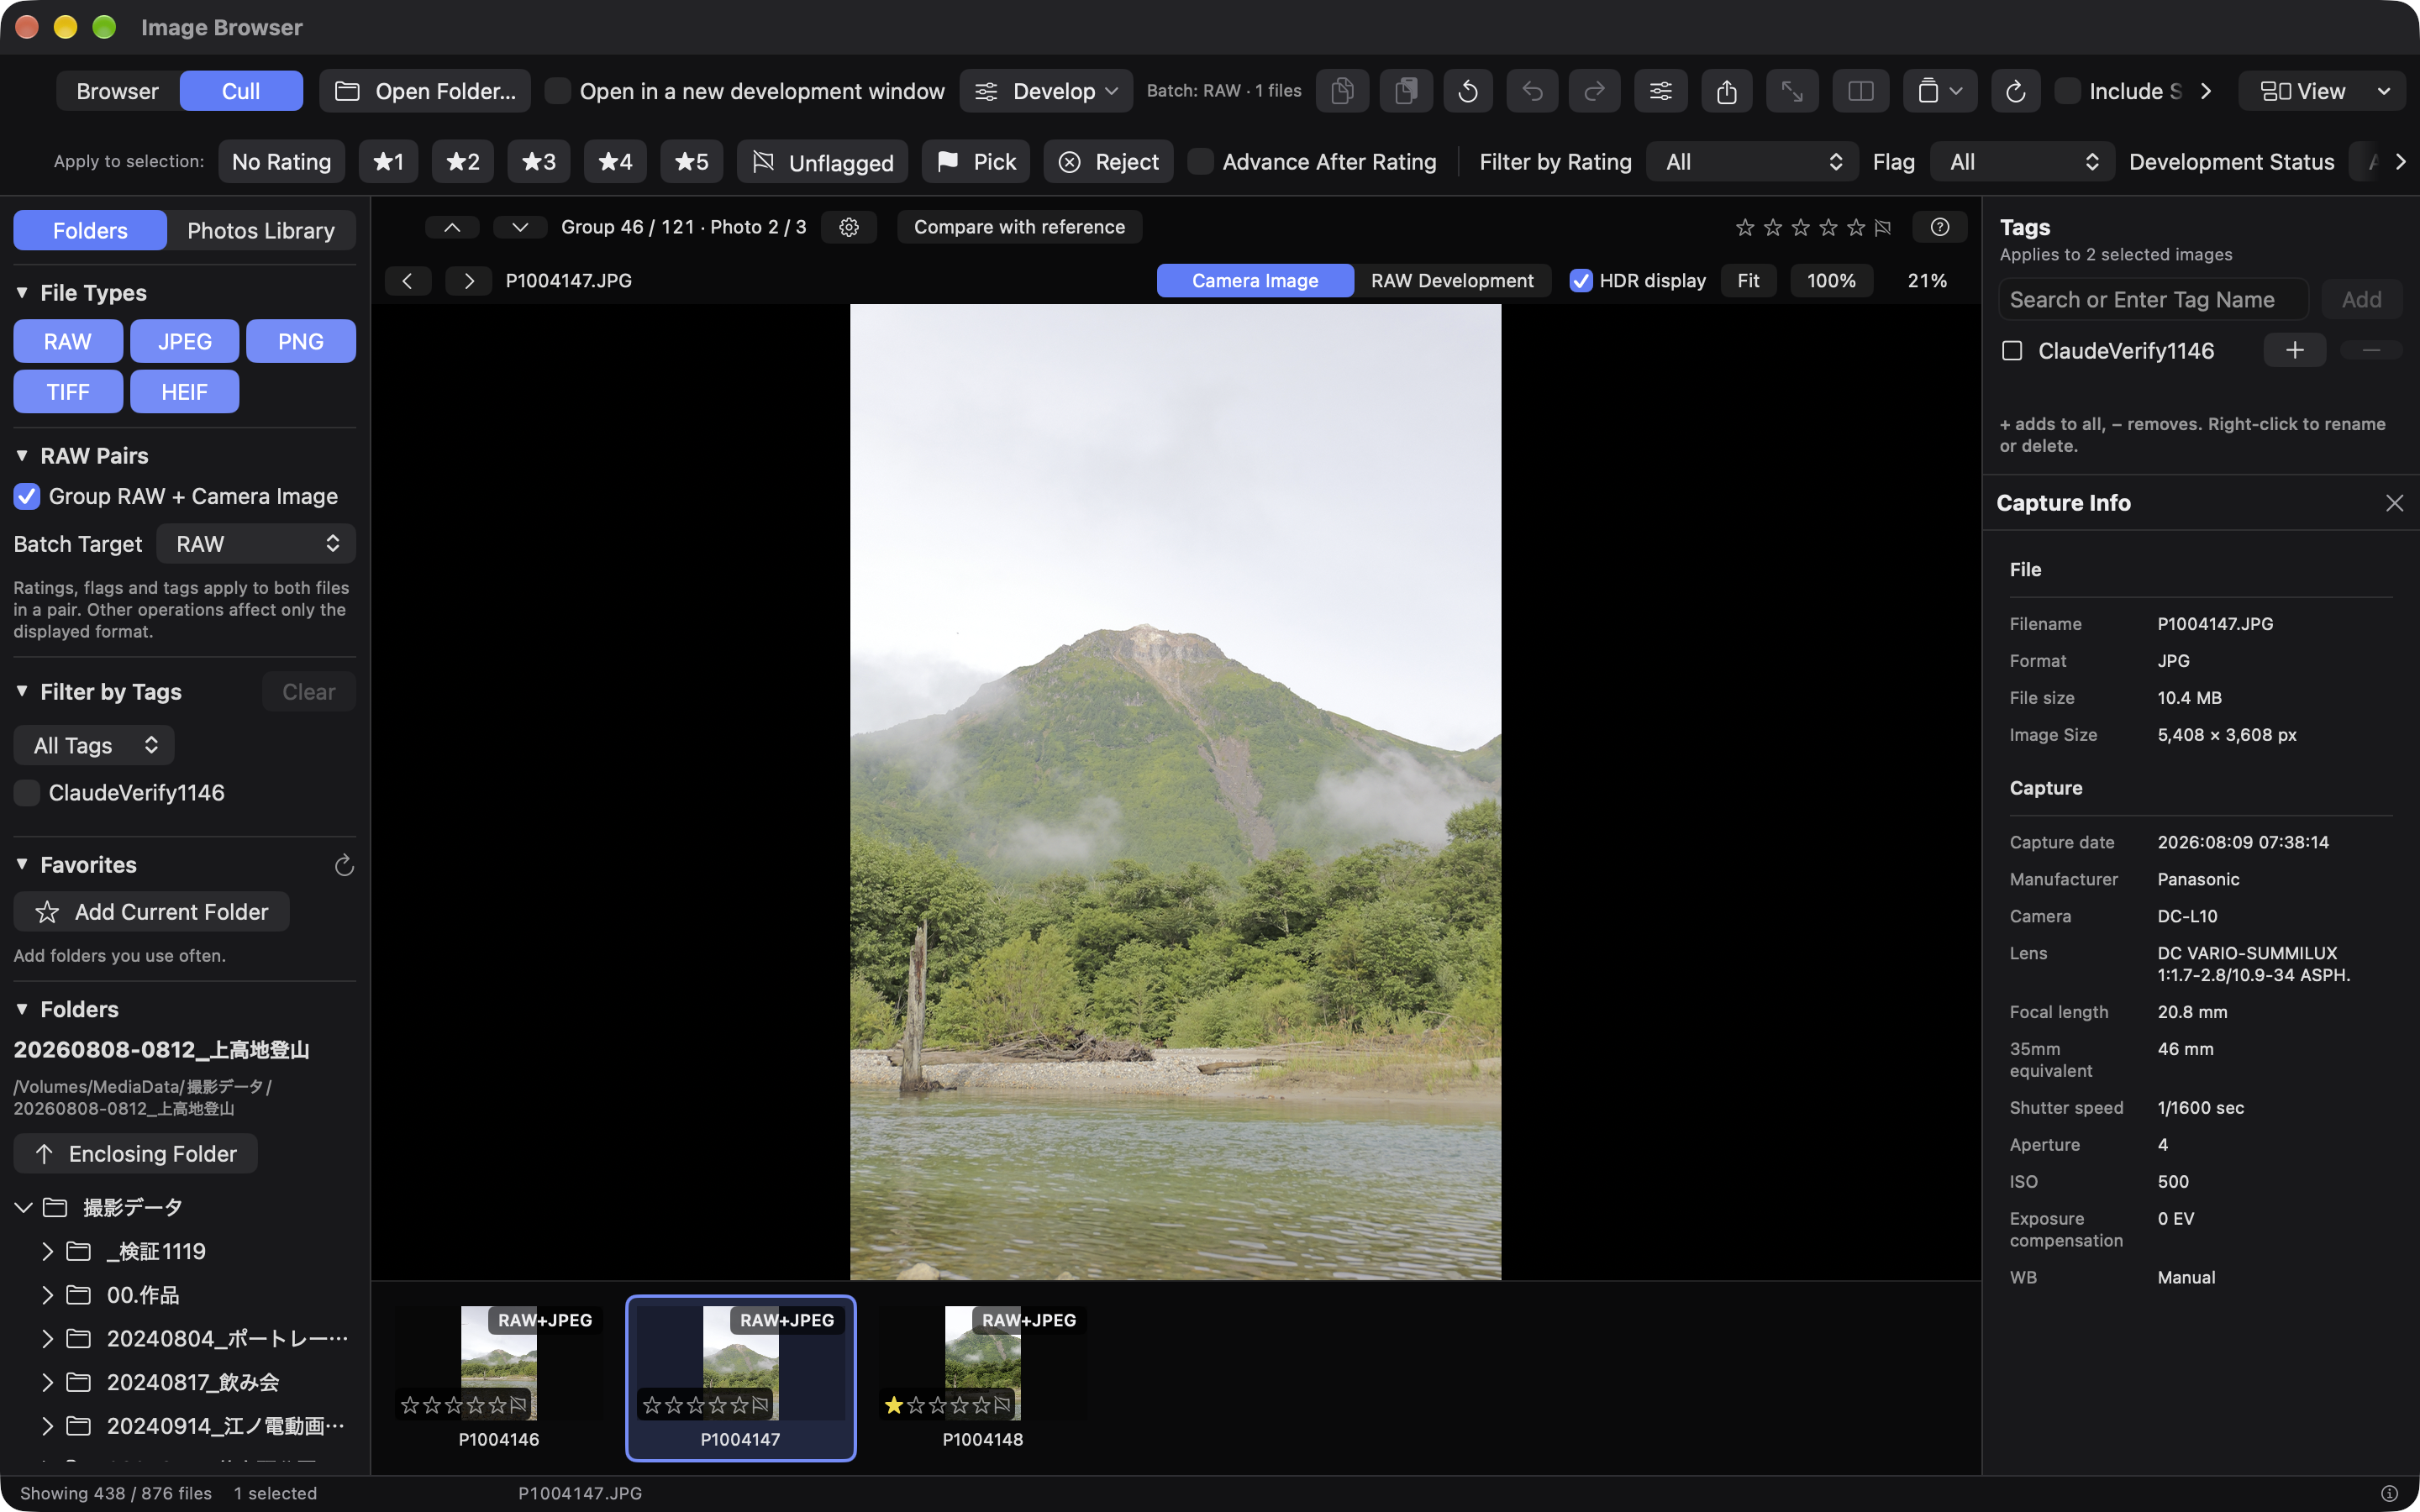
Use the Browser/Cull switch in the toolbar. Cull displays the current photo at a larger size, with its position, rating, flag and filmstrip. Both folders and Photos Library use the existing source, selection and assessment state.
Use Left/Right to browse, 0–5 to rate and P/X/U to pick/reject/clear the flag. Advance-after-assessment and browser filters remain shared. Return using Browser, Space or Escape; the last viewed photo remains selected.
RAW/camera-image pairs follow the existing pairing setting. Photos hidden inside collapsed stacks are not included; expand stacks first to review all their members. Face enlargement assistance is planned for a later phase.
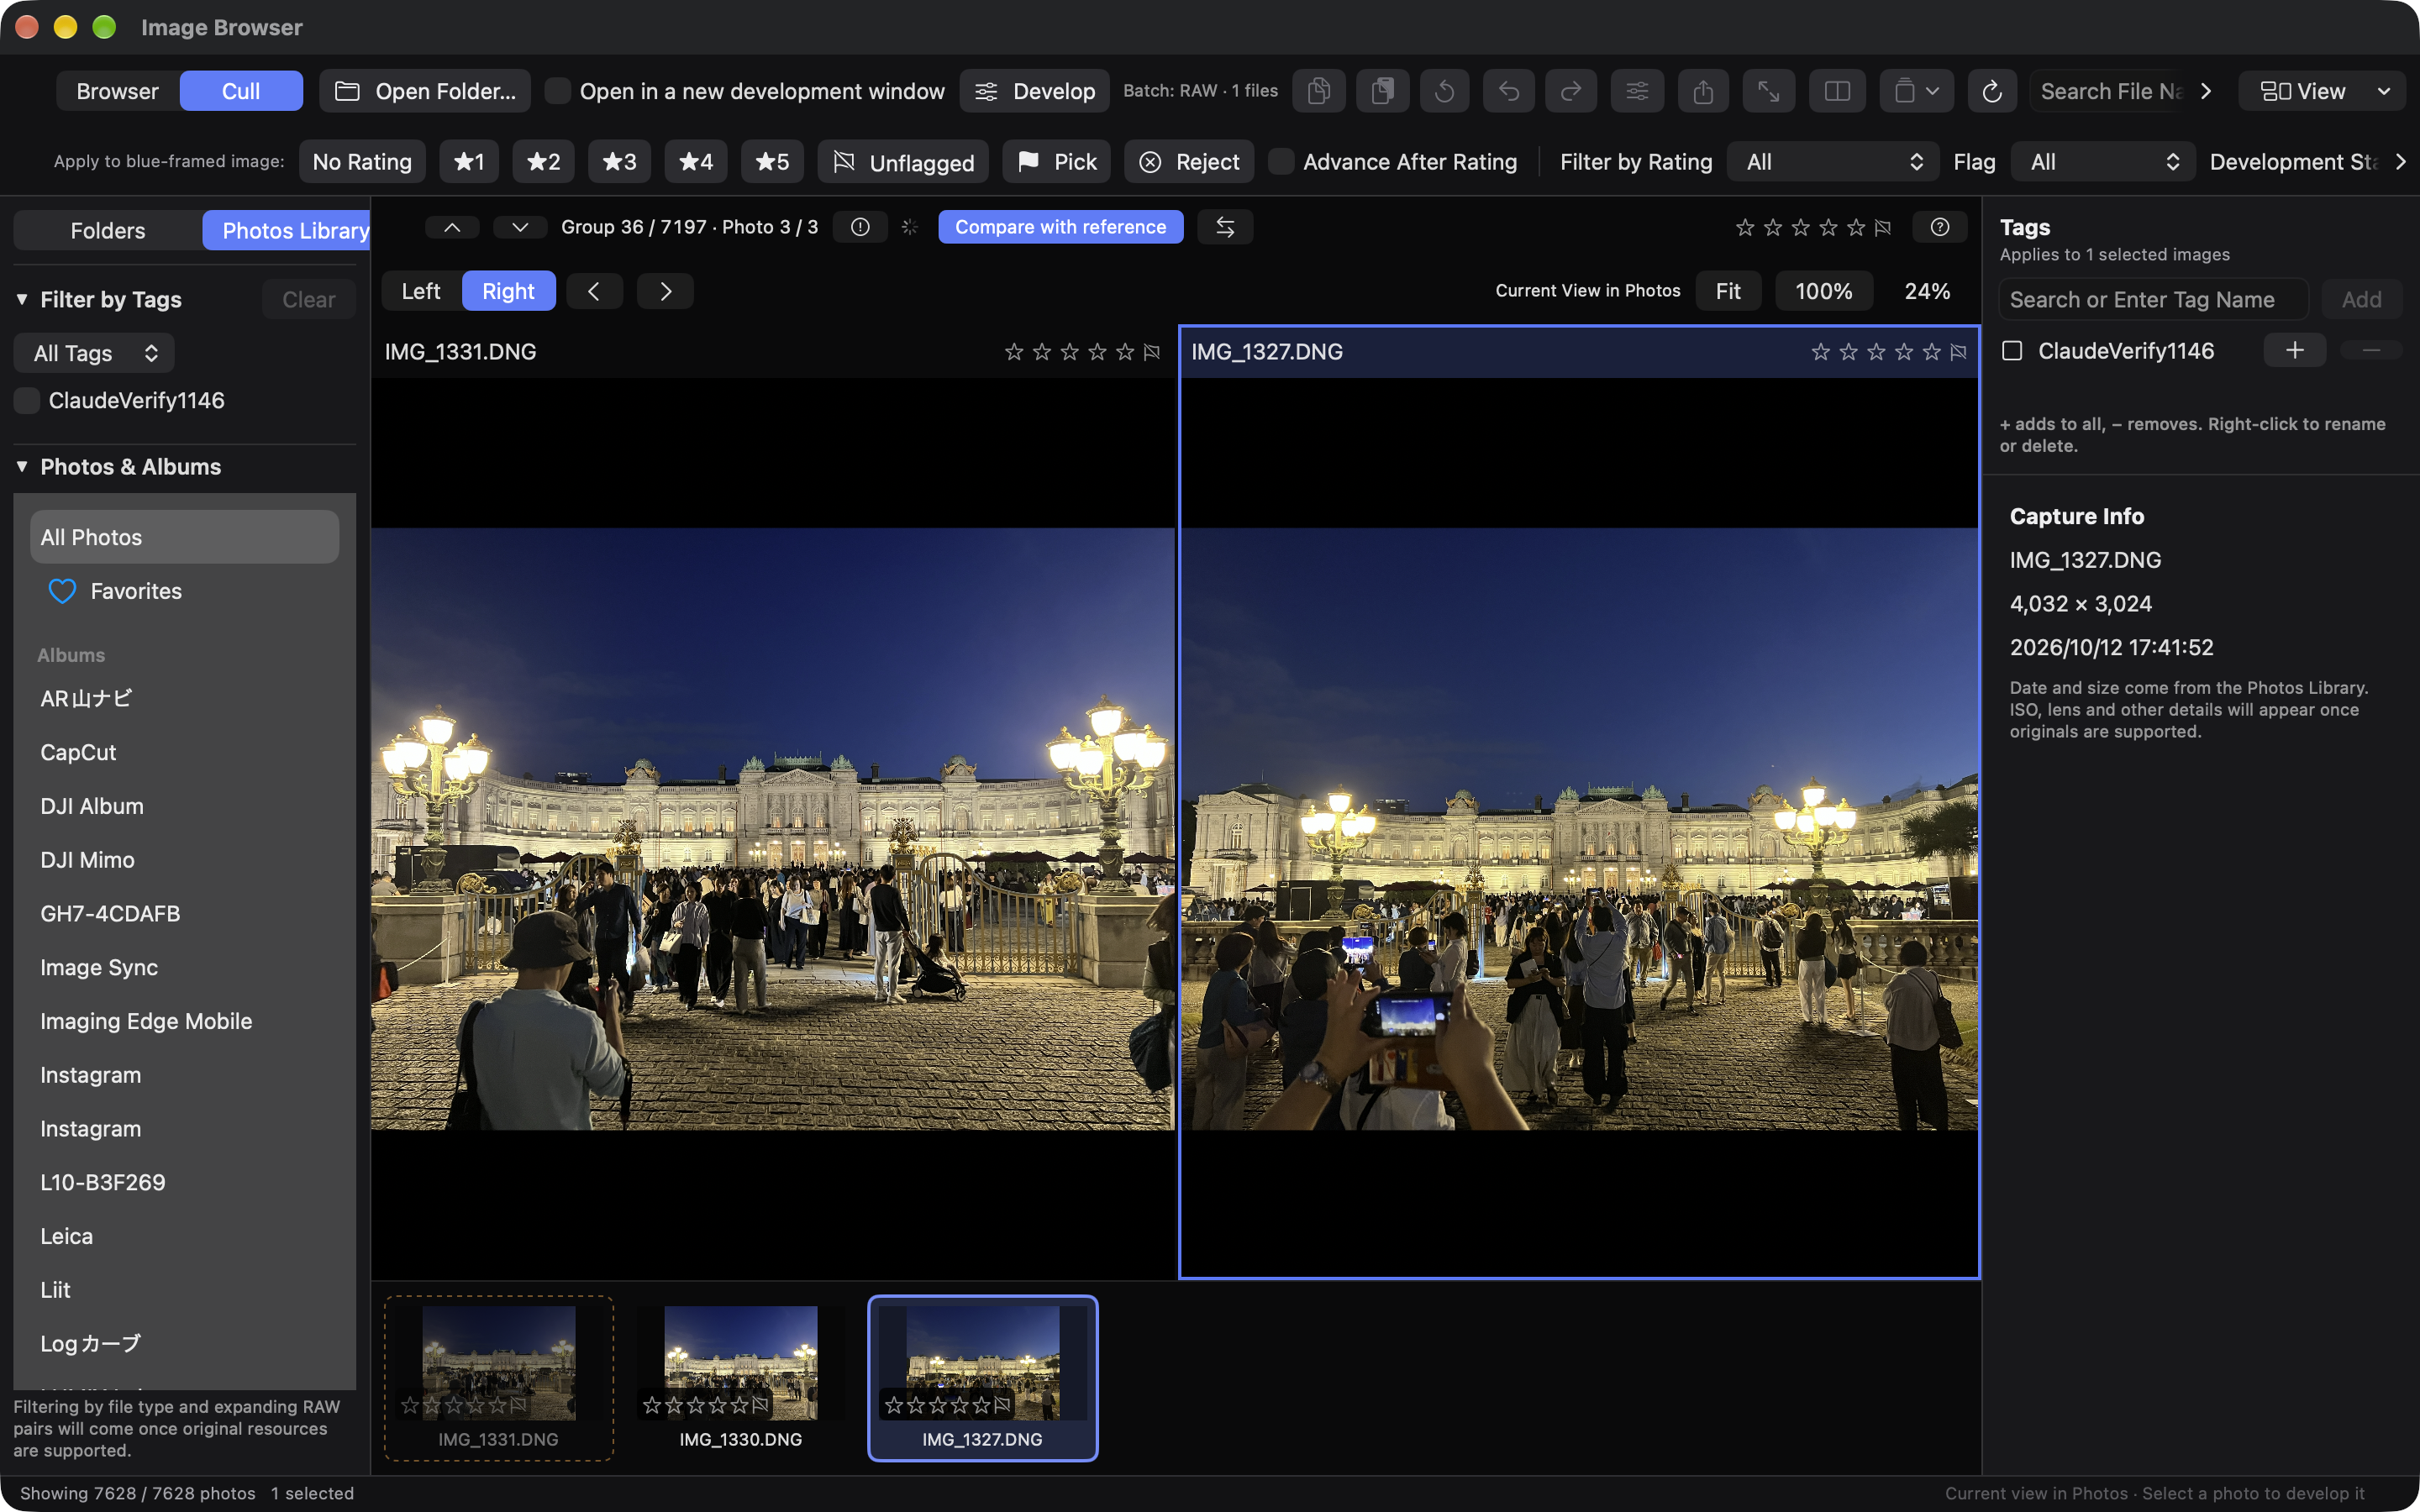
The same culling controls are available for Photos Library. Capture dates follow the macOS regional date settings.
Grouping similar photos
With Group similar photos enabled, entering Cull automatically analyzes the visible set or restores a saved result. Use the gear button to change settings or manually reanalyze. Move the Similarity slider left toward Closest matches to group only very similar photos, or right toward Broader groups to include more differences. Capture time and portrait/landscape orientation do not impose separate grouping rules. Changing Similarity reuses distances without analyzing images again. The value beside Similarity represents the allowed difference, not a match percentage; larger values create broader groups. It is shown with two decimal places: range 0.00–2.00, step 0.01, initial value 0.50. Similarity and the grouping toggle persist across launches.
Up/Down moves between groups; Left/Right moves within a group. The filmstrip shows the current group. Advance-after-assessment proceeds to the next photo in the group, then the next group, and stops at the end. Turn grouping off to browse all photos in the existing sort order.
You can continue reviewing during analysis. Stop retains partial results; unanalyzed or failed photos remain singletons. Open the gear button for failure details. New inputs are analyzed automatically; changed image revisions invalidate old groups. Rating/tag filters preserve previously analyzed group membership while hiding nonmatching photos.
For Photos Library, optionally enable Allow network access for analysis previews. It defaults to off; photos without a locally available preview may fail analysis. This controls bulk analysis only; normal enlarged previews keep their existing behavior.
Feature prints and distances needed for grouping are cached on disk across launches, with up to 2,048 feature prints also retained in memory. Added or changed inputs reuse existing features while distances are recomputed. An identical ordered input set restores its result without comparisons. Deleted or corrupt caches and OS/analysis-version changes trigger fresh analysis as needed. Results containing failures are not persisted, but successful feature prints are. Large sets still take time to compare. Groups use transitive similarity: if A matches B and B matches C, all three can join the same group. Move Similarity left if groups become too broad.
Compare with a reference
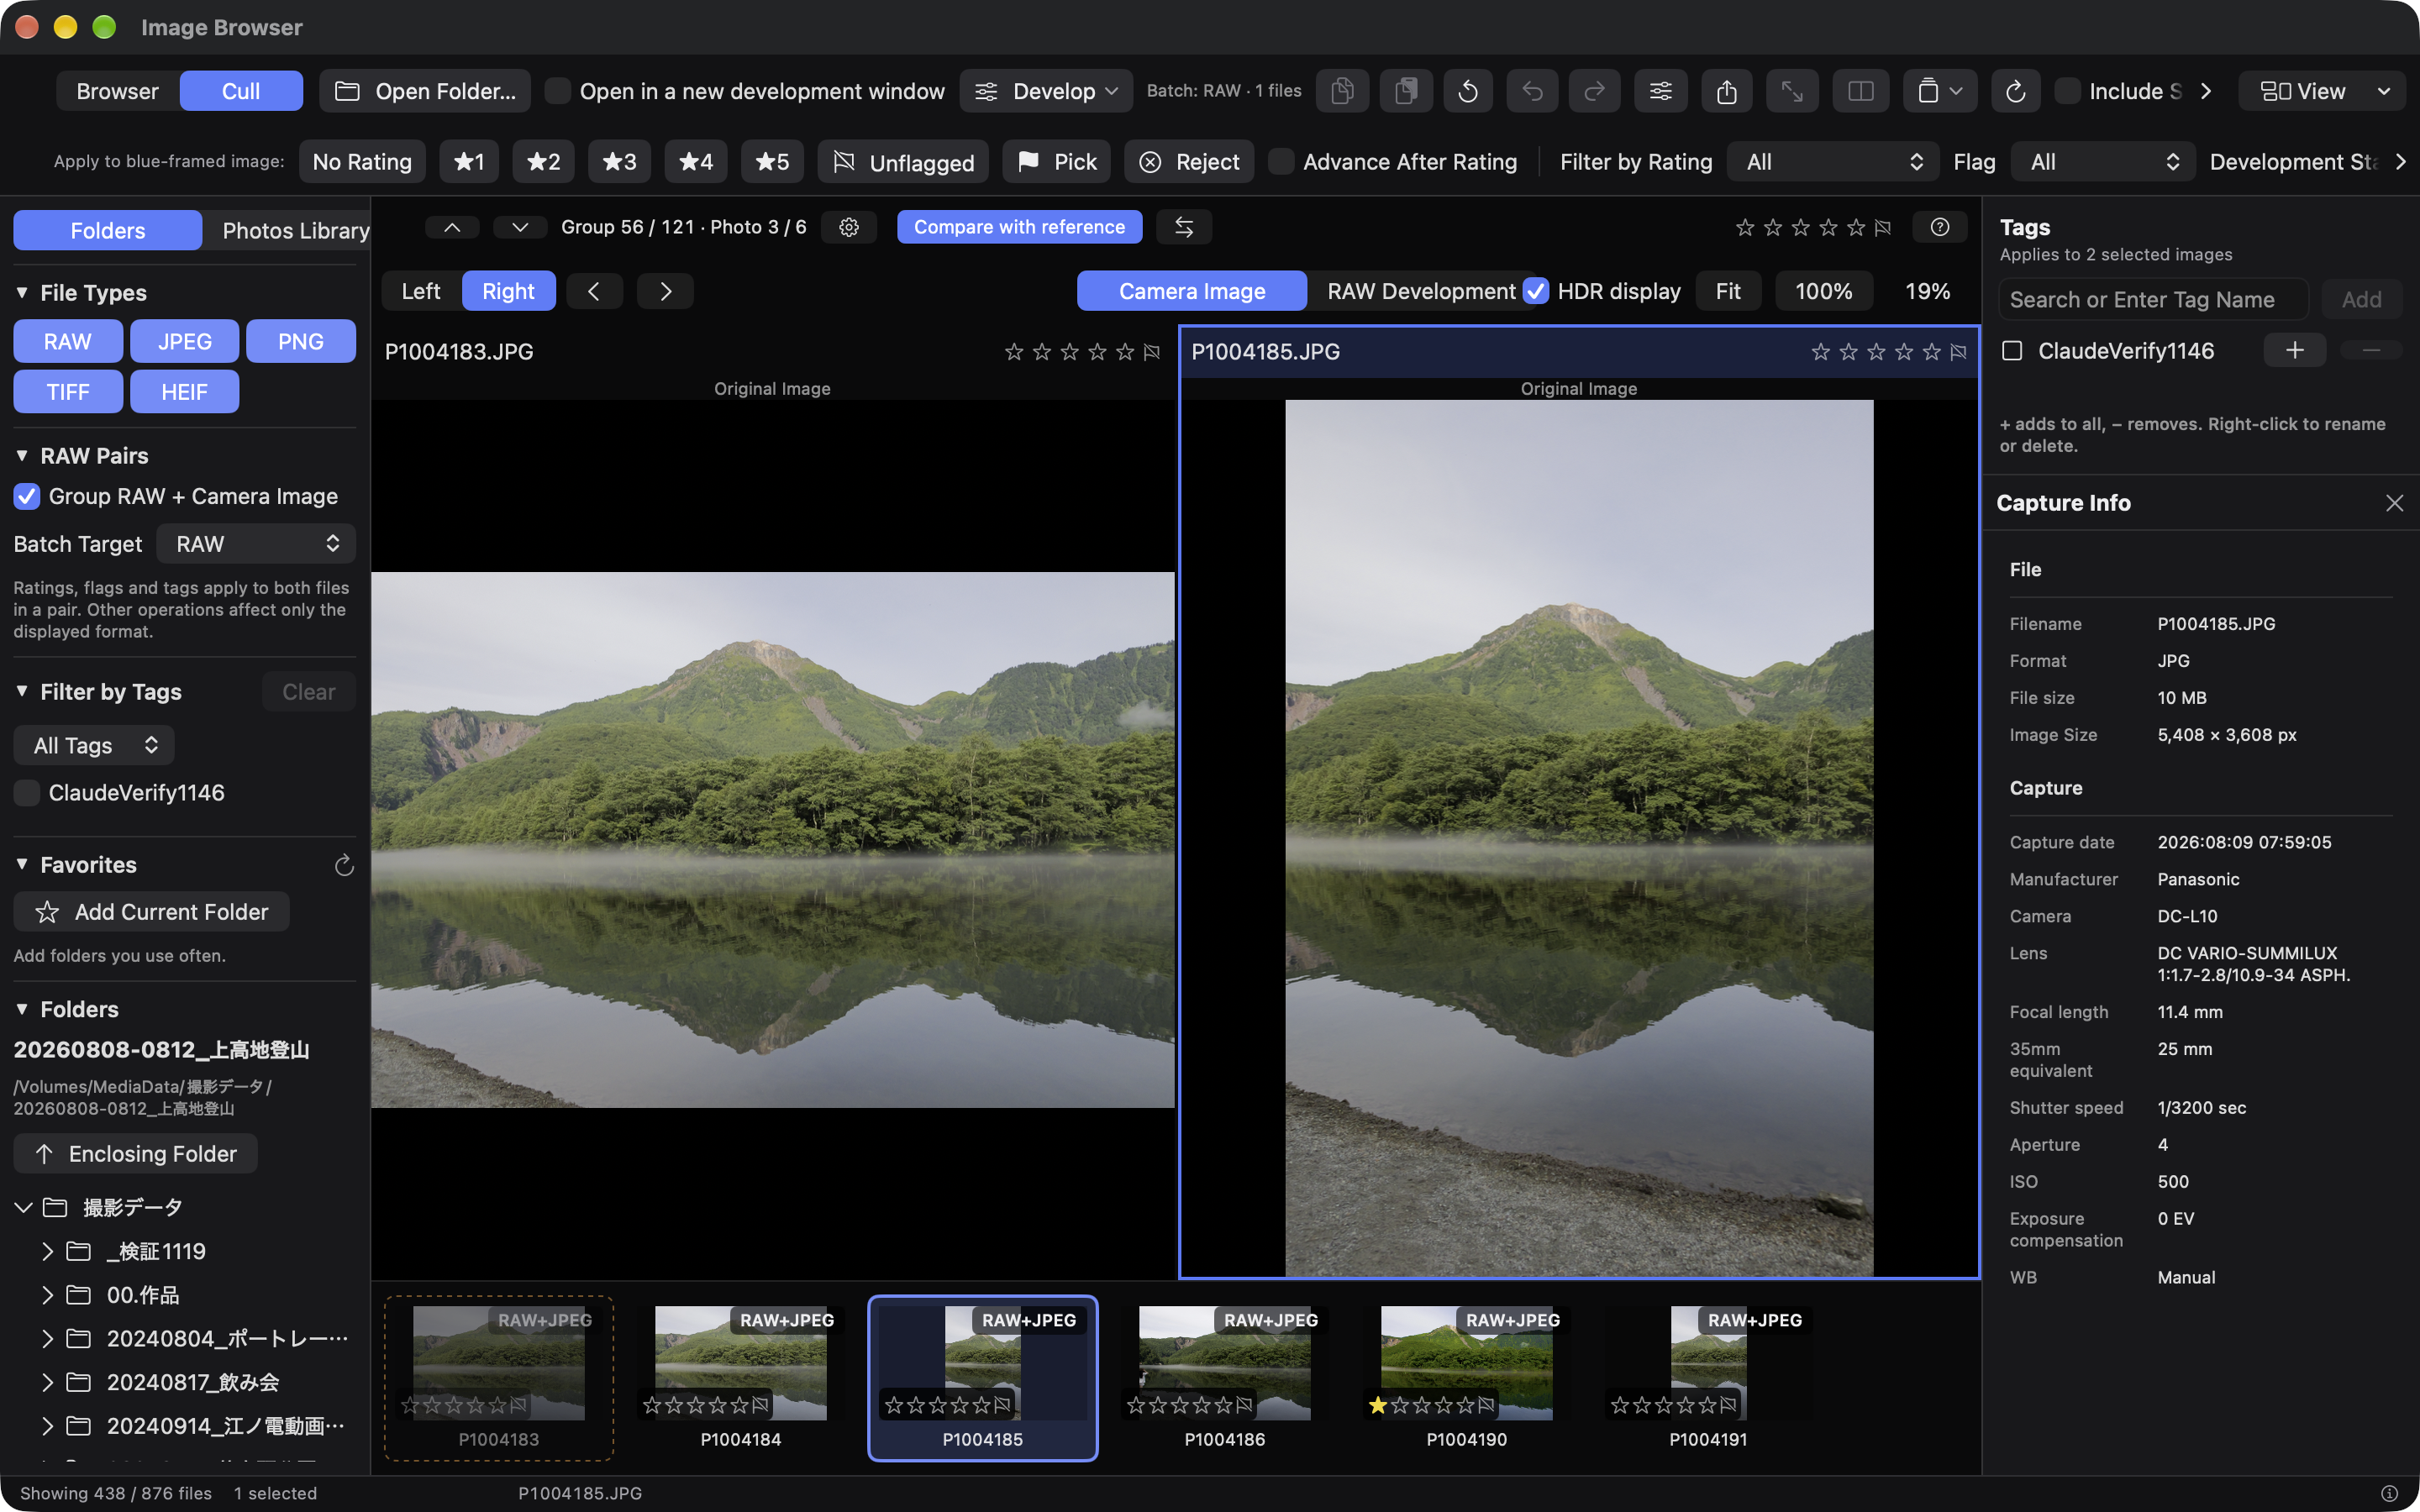
Enable Compare with reference in Culling to pin the current photo on the left and show another photo from the same group as the candidate on the right. Left/Right, Previous/Next, and filmstrip thumbnails change only the candidate, skipping the reference. Turn off similarity grouping to compare across the entire visible collection.
Press B or click the swap-arrow button (Use candidate as reference (B)) to swap the candidate and reference. The former reference becomes the candidate so you can immediately compare them again. Fit, 100%, zoom, and pan remain synchronized.
The blue border identifies the target for ratings, flags, tags, and development. Click a pane or press Tab to switch targets. Left/Right always browses candidates regardless of the active pane. Advance after assessment applies to candidate ratings only; rating the reference does not advance.
Up/Down moves to another group and establishes a reference there. Singleton groups use the single-photo view; comparison resumes in groups with multiple photos. Filters and Similarity changes also replace the reference if it no longer belongs to the current group. Reference choices are temporary and reset when you leave Culling.
Per-photo RAW decoder
Choose a RAW decoder for each photo in the development window. See “Per-photo RAW decoder” in Adjusting Brightness and Color for selection, saving, and comparison behavior.
Compact culling controls
The center area has two toolbar rows: group navigation/reference comparison and photo display controls. Open the gear button for grouping, Similarity, analysis, and analysis network access. Open the question-mark button for shortcuts. Swap the reference and candidate with the arrow icon or B. Ratings, flags, and thumbnails remain visible. Return with Browser or Space/Escape.
Adjusting Brightness and Color
Screen layout and display
The toolbar is at the top, the image is in the center, and the development panel and Layers / Metadata / Color Picker tabs are on either side. You can swap the side panels in settings.
- Pinch or use zoom controls to zoom. Fit shows the whole image; 100% helps you inspect detail.
- Scroll or drag to pan. An active on-image editing mode may use those inputs for editing instead.
- Click the triangle beside a panel heading to expand or collapse it. The histogram stays outside the development panel's scrolling area.
- Use the settings button near the histogram heading to reorder or hide development panels.
- Toolbar settings let you arrange items and groups, hide items, and insert separators. Scroll horizontally when controls do not fit. Arrows and faded edges indicate additional controls.
- Use the display menu beside the toolbar to show or hide either panel and the top/bottom status areas.
- Ready / Processing indicate the processing state. If an image-click operation does not respond, wait for rendering to finish.
Individual panels' expanded/collapsed states are not currently saved between sessions. Their order and visibility settings are saved separately.
Adjust the image
Select Base for whole-image development. Selecting an adjustment layer displays that layer's settings. Some controls, such as RAW noise reduction, are not available per layer.
| Setting | Purpose |
|---|---|
| Exposure | Adjust overall brightness |
| White Balance | Correct color casts with Temperature and Tint |
| Highlights / Shadows | Adjust bright/dark regions; −100 to +100 is effect strength, not EV |
| Whites / Blacks | Adjust the white/black ends of the tonal range; check with clipping indicators |
| Tone Curve | Adjust the combined curve or R/G/B separately; combined and channel curves can both apply |
| HSL | Adjust hue, saturation, and brightness by color |
| Color Grading | Add color to different tonal ranges |
| Dehaze / Clarity / Structure | Adjust haze and local contrast |
| Output sharpening | Adjust edge definition; also inspect at 100% |
Double-click a slider, or use its reset button, to restore that setting's default. RAW-dependent controls such as Temperature and Tint return to that image's defaults. Undo with ⌘Z and redo with ⇧⌘Z, or use the toolbar arrows.
Increasing Temperature warms the image; decreasing it cools the image. Positive Tint adds magenta; negative Tint adds green. Previously saved corrections retain their appearance. For adjustment layers and standard images, the displayed correction sign may differ from earlier versions.
White balance and noise reduction for rendered images
JPEG/PNG/TIFF/HEIF white balance adds a correction to an already developed image. When a valid recorded Kelvin value is available, temperature is displayed in K relative to that baseline. Otherwise, it is displayed as an offset from zero. This is a recorded setting, not an estimated illuminant temperature; Auto/Manual EXIF flags and ISO are not used to guess it. Reset returns to the image's baseline. The WB picker is available.
Select Base to adjust luminance and color independently under Noise Reduction. These algorithms differ from the RAW decoder's NR, so inspect their effect on the photo. RAW source-area and built-in RAW lens correction do not apply to rendered images. Exposure, tone, layers/masks, finishing sharpness, and SuperEdit use the shared controls.
White balance picker
- Select Base and click “White balance picker.”
- Click a white or gray area that is not clipped.
- Check the Temperature and Tint values and the image.
A colored object becomes the reference color if you click it. Click the picker button again to cancel the operation.
Adjust colors and tones on the image
Enable HSL on-image adjustment and click a color. A color swatch and selection information appear. Drag the marker's three handles horizontally to adjust hue, saturation, and brightness. Hue may be unavailable for white or gray samples.
For Tone Curve on-image adjustment, choose a channel and click the tone you want to adjust. ↑ or → increases it; ↓ or ← decreases it. The mouse wheel also adjusts it. Choose an intermediate tone rather than a black/white endpoint, and sample again after changing channels.
Turn the operation button off to exit. These buttons are reddish when inactive and green when awaiting image input; the cursor also changes. The red color does not indicate an error.
Crop, straighten, and lens correction
Select Base to change the composition of the whole image, and wait for rendering to finish before adjusting it.
Crop the image
- Open Crop in the development panel and click Edit.
- Choose an Aspect ratio, such as Free, Original, or 1:1.
- Drag the corner or edge handles to resize the crop. Drag inside the rectangle to move it.
- Click Done to inspect the cropped result. Click Edit again to refine the area.
Click Remove crop to clear it. The original image file is unchanged. Use ⌘Z to undo an operation.
Straighten the image
Adjust the angle slider under Straighten, or enter an angle and press Return to commit it. You can also use SuperEdit's default F key. Click the reset button or double-click the slider to return to 0°.
Toggle RAW lens correction
For supported RAW files, use Enable Lens Correction under Lens Correction to compare on and off. The reset button restores that RAW file's default. This control is unavailable for rendered images or when the selected decoder does not support it. Correction can change the field of view, so check the final composition together with the crop.
Film Style
- Select Base and choose a finish from “Film Style.” In the default panel order it is below White Balance.
- Use Fit to compare color and tones, and 100% to inspect grain and edges.
- For styles with grain, click the dice button beside the menu to change the grain pattern. It is disabled for styles without grain.
- Choose None to remove the effect.
There are 23 styles, including monochrome, color, and F-series styles. These are creative color, tone, and texture treatments, not measured reproductions of physical films or developers. The product panel does not expose developer, processing time, or temperature settings.
The selected style and grain pattern are saved with the editing state. If bundled style definitions change in a future version, saved photos may use the updated definitions. Export JPEG/PNG/TIFF copies to preserve a finished image.
Per-photo RAW decoder
For RAW development, use RAW settings at the top of the left panel. Choose Auto or a decoder supported by that photo: RAW 8, RAW 8 DNG, RAW 9, or RAW 9 DNG. In use shows the actual decoder. This control is not shown for JPEG, PNG, TIFF, or HEIF.
The selection is saved with the photo's edits and used when reopening, comparing saved edits, generating thumbnails, and exporting. The initial-state comparison uses the current decoder; snapshots and variations use their saved selection. Switching preserves other adjustment values and disables unsupported controls. Switching back restores their use. Undo/Redo includes decoder changes. Applying a preset preserves the destination photo's decoder selection.
Existing edit documents default to Auto, whose priority remains unchanged. Noise reduction support and rendering can differ between decoders. If a DNG responds weakly to NR, compare with RAW 8 DNG when available.
RAW source area
For supported RAW files with recorded capture-crop information, “RAW source area” offers:
| Choice | Area used for display and development |
|---|---|
| Capture area | The field of view specified by the camera at capture; the default |
| Full sensor area | The retrievable active sensor area, including areas outside the capture crop |
Change it below the histogram or in the top status area. The browser and export use the same per-image choice. Choices persist after restarting; the original image is unchanged.
With “Full sensor area,” enable “Show capture area outline” to display a yellow dashed outline in single-image view. The outline is for inspection and is not exported.
App settings set the default RAW source area for images without a per-image choice. Existing choices take priority. Full-area extraction supports RW2 files whose area information can be read. The menu is disabled for unsupported files.
Changing the source area applies existing crops, masks, and spot repairs at the same relative positions within the new area. Choose the area before positioning corrections, and check their placement after changing it. Copying development settings does not transfer the source image's RAW source area.
Finish with LUTs
- Select Base or the desired adjustment layer and add a 3D .cube file from the LUT panel.
- Choose input/output profiles to match the LUT's requirements. They are not automatically detected from the file.
- Adjust the blend amount. Multiple LUTs apply from top to bottom, so order matters.
- Use each checkbox to compare enabled/disabled states. Delete unwanted entries with their trash icons.
Base LUTs apply to the whole image after layer compositing and geometry. A layer's LUTs apply before that layer is blended, and are affected by its mask and amount. Both apply if configured in both places.
LOG profiles convert the image to the color space and gamma required by a LUT. Selecting the RAW camera's manufacturer alone may not be sufficient. LUT files are not included. Profile and format details are in the feature reference, currently in Japanese.
Compare editing states
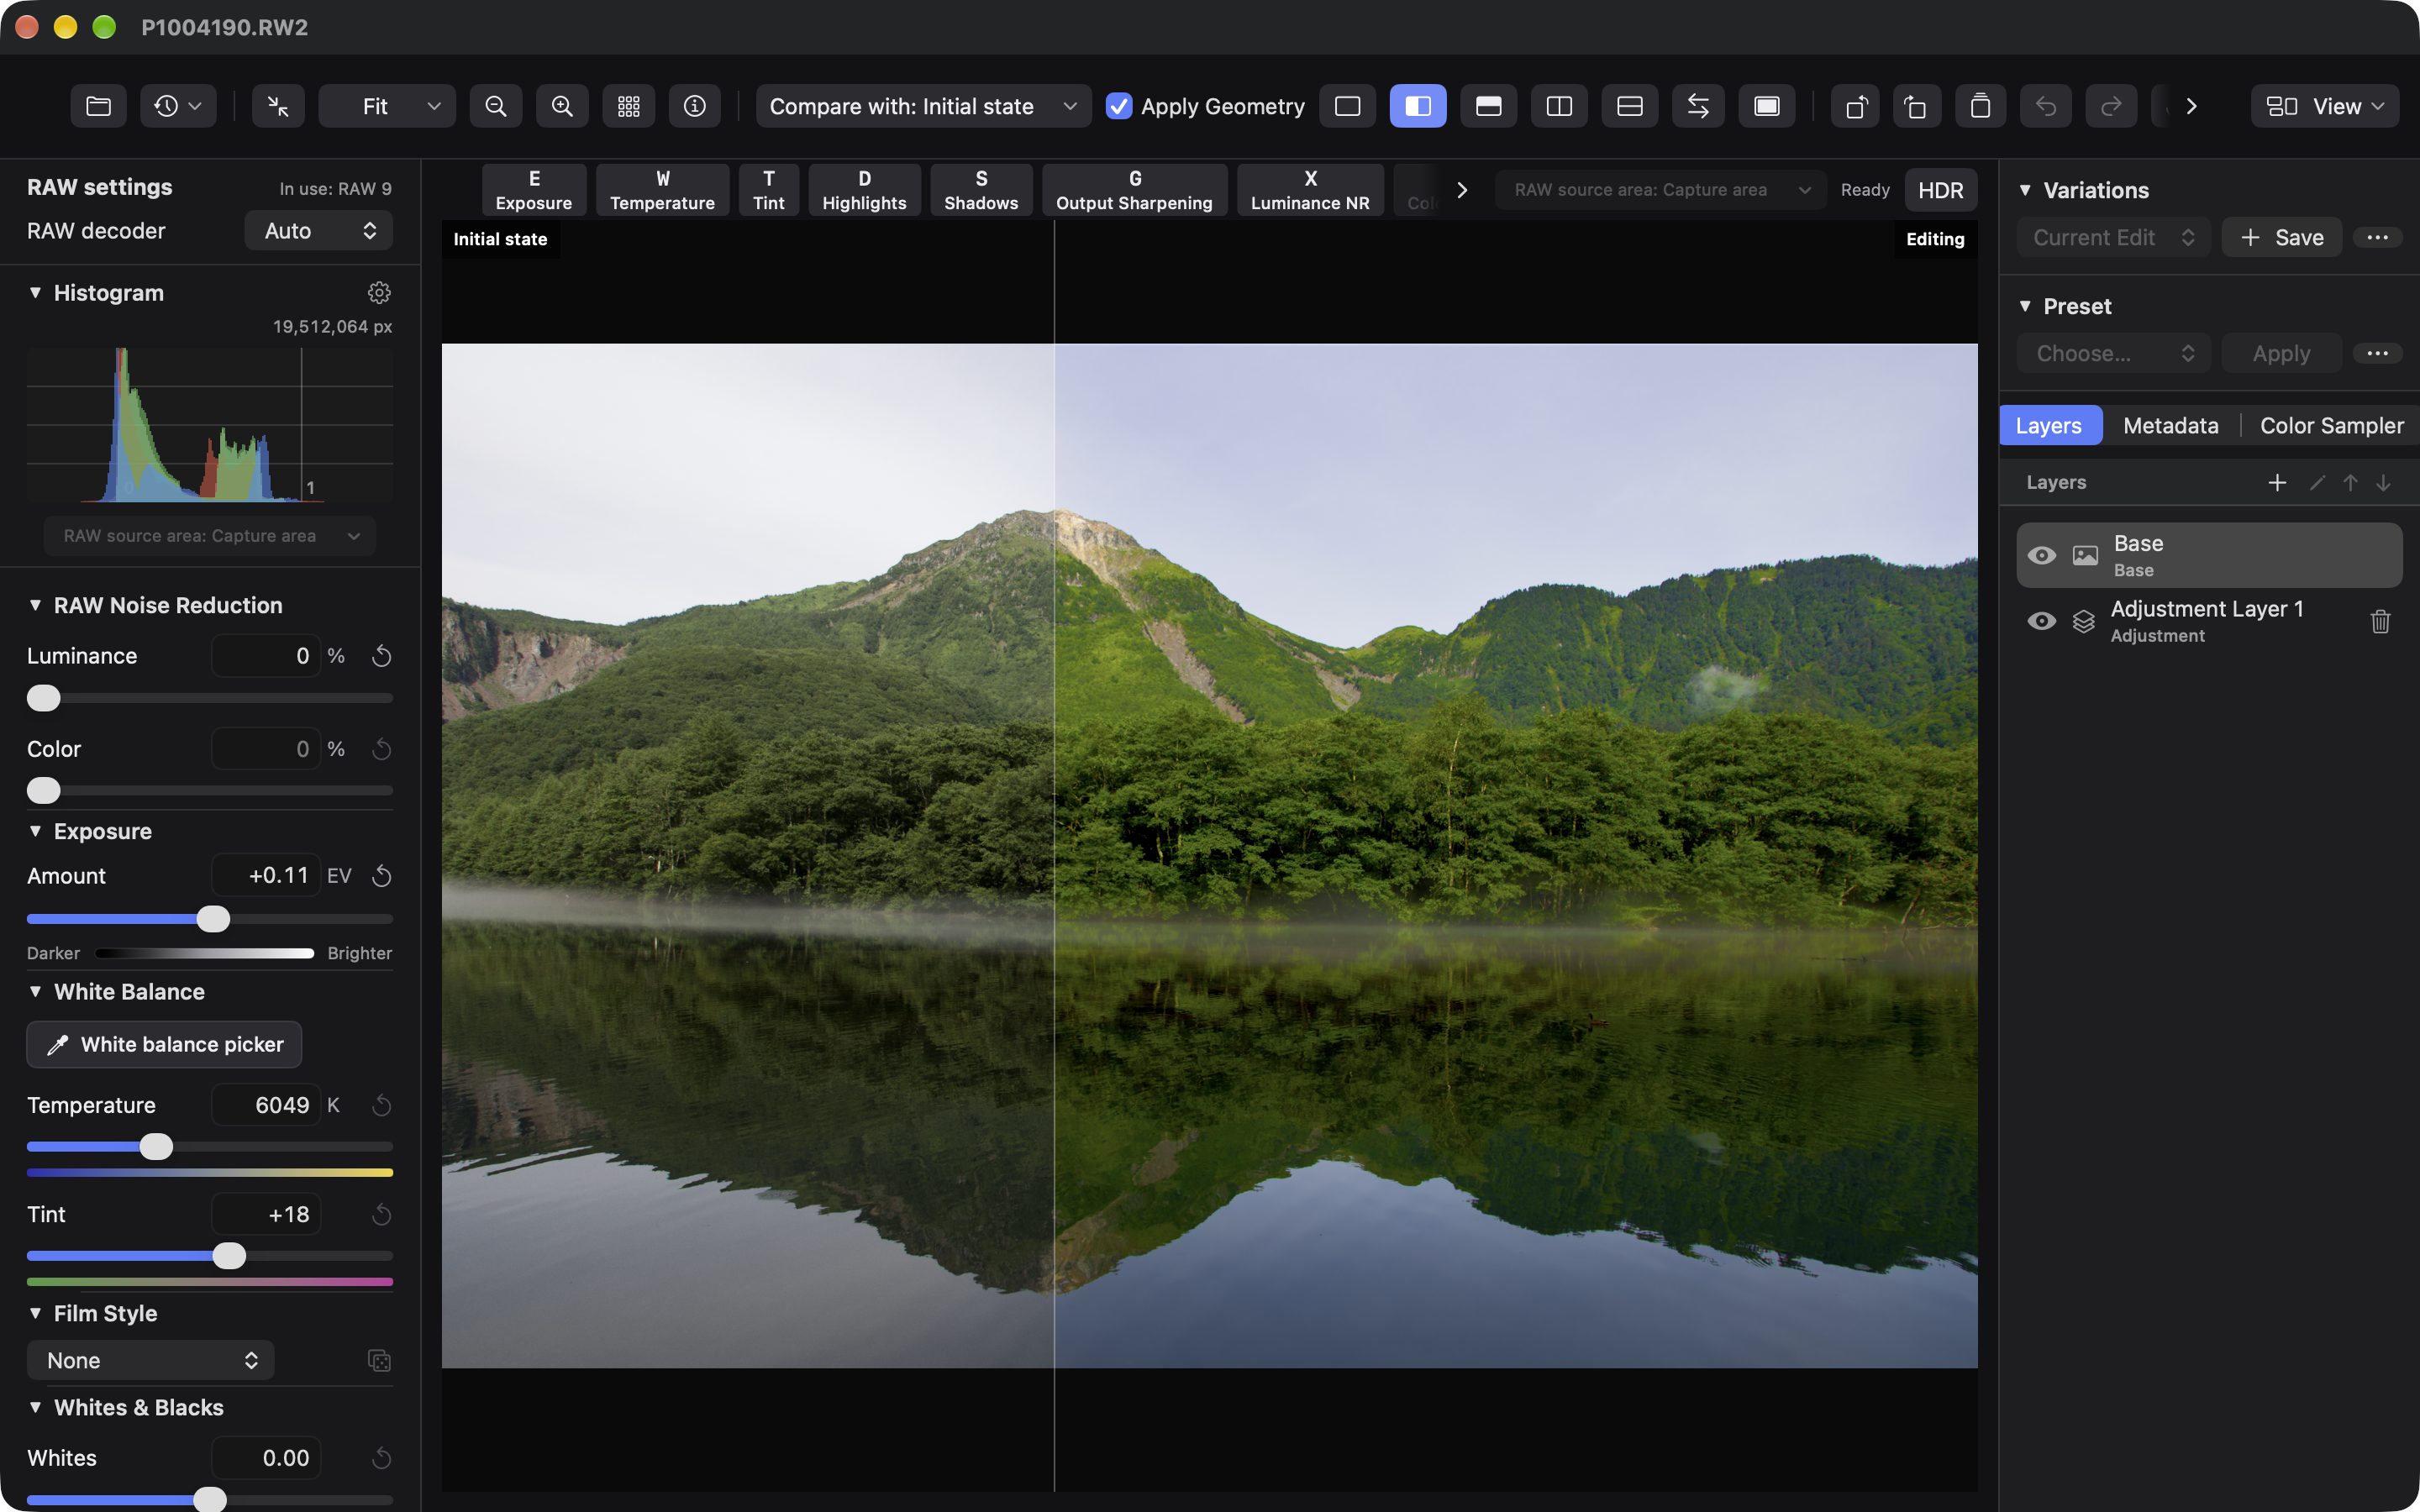
Choose “Initial state,” a saved snapshot, or a variation as the comparison source. Use the toolbar buttons for single view, horizontal/vertical overlays, and split views. Full-image comparison is also available.
“Apply geometry” is on by default. It applies the working image's crop, straightening, and lens correction to the comparison image, aligning their shapes and positions. Turn it off to show the comparison's original geometry. This does not change the saved comparison data.
When you open the RAW member of a RAW+JPEG/HEIF pair displayed in the browser, “Camera original JPEG” or “Camera original HEIF” becomes available as a comparison source. It shows the original companion without its saved development settings. “Apply geometry” shares the working crop and straightening, without applying lens correction again to the camera image. Differences in capture framing or camera processing may prevent exact alignment. This choice is unavailable when pair grouping is off or when a RAW is opened directly in the editor.
Turn off mask overlays and on-image editing modes if they obscure the result.
Reset all development settings
Use “Reset Development Settings” in the toolbar, shown as a counterclockwise arrow, to return the whole image to its input defaults. This resets development settings, additional layers, and masks, even if an adjustment layer is selected. WB, RAW noise reduction, and lens correction return to the RAW file's defaults. Saved variations, presets, and the RAW source area are kept.
The reset is one Undo/Redo operation in the development window. Undo can restore unsaved edits as well. The browser thumbnail returns to the camera preview for RAW, or the original image for rendered inputs, after reset; Undo/Redo follows the normal automatic-save and developed-thumbnail workflow.
Change the reset button's position or visibility in toolbar settings.
RAW HDR preview
Open a RAW photo and click the small HDR button beside the status text, such as “Ready”, above the image. It turns bright blue when enabled. If it is hidden, enable the top status bar from the display menu.
RAW HDR preview defaults to off and returns to off when you reopen a photo. The normal image remains visible while the first HDR frame is prepared; subsequent frames follow your edits. RAW comparison images also use HDR preview. Appearance depends on the display’s HDR capability and brightness settings.
This changes presentation only. Editing values, the histogram, saved thumbnails, and export settings remain unchanged. There is no dedicated HDR histogram switch, scale, or limit marker. To save HDR, select HDR (PQ) separately in the export panel.
Starting on-image color picking or HSL/tone editing, cropping, mask display/editing, spot repair, or highlight/shadow warnings turns RAW HDR preview off. It cannot be enabled during those operations. Preparation failures also turn it off and display an error.
Its initial state and interaction rules differ from HDR display for rendered HDR images, described below.
Developing HDR images
New edits preserve HDR in gain-map HEIF/JPEG and PQ/HLG HEIF. Use the shared panels, SuperEdit, layers/masks, saved edits, and comparison. HDR camera-original companions are also available for comparison.
“HDR display” appears for HDR content. Turn it off to preview SDR presentation without changing editing values or the saved input interpretation. It defaults to on per window. macOS adapts presentation to the display's HDR capability.
Existing SDR edits retain their previous interpretation; an explicit SDR-to-HDR migration control is not yet available. For validation, use an HDR image without saved edits.
The histogram includes values above 1. HDR highlight warnings use image headroom, not sensor saturation. If an operation loses headroom metadata, input headroom and exposure provide an estimate.
Existing filter domains are retained. Color grading can bypass luminance at or above 1, and SDR LUTs can limit HDR highlights. HDR-specific LUT and mask domains are separate work. Default exports convert HDR to SDR. To save HDR, choose HEIF HDR (PQ); see Export.
SuperEdit and Keyboard Controls
SuperEdit
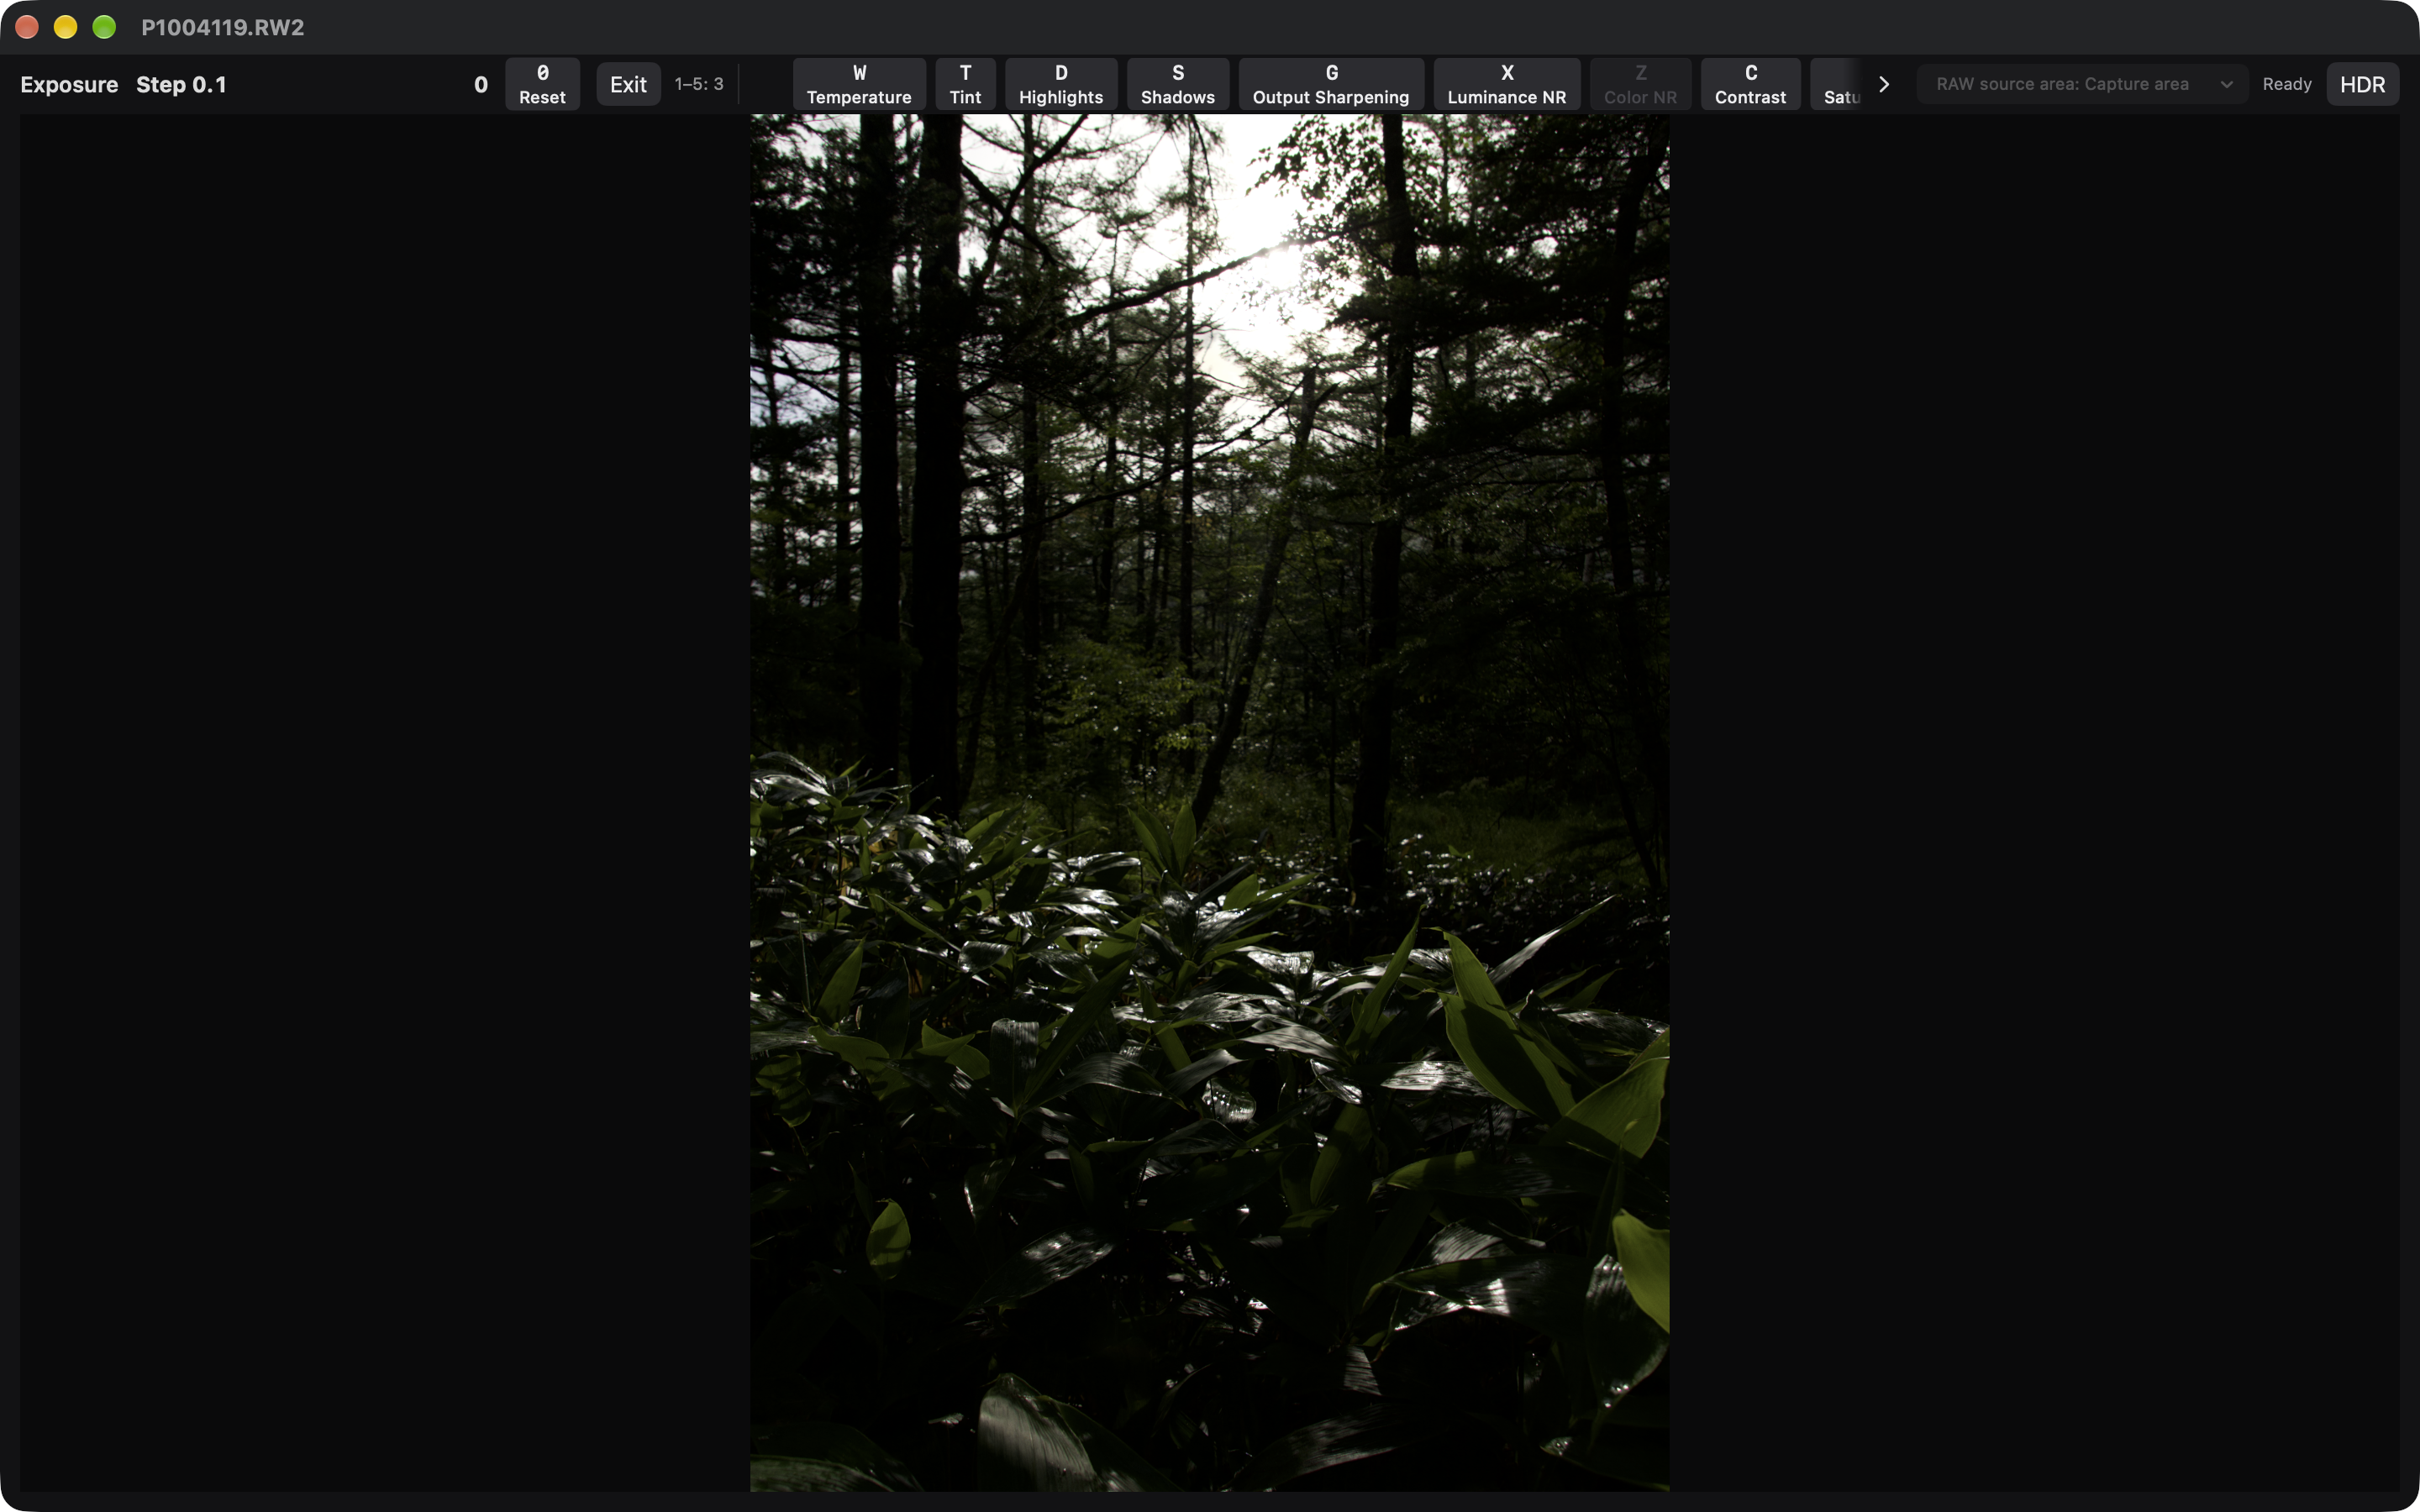
The screenshot shows the English interface, with the active adjustment, Reset, Exit, and setting-switch buttons across the top.
Adjust development settings with keys and the mouse wheel without moving the pointer to sliders.
- Open a photo and select the layer to adjust.
- Press the setting's assigned key: E for Exposure or W for Temperature, for example. You can also click a key/setting tile in the top status area.
- Check the active setting, step size, and current value in that area.
- ↑ or → increases the value; ↓ or ← decreases it. The mouse wheel or trackpad scrolling also changes it.
- Press 1–5 to change the step level. Use a smaller level for finer adjustments.
- Press Esc (the default), use a configured exit key or click, or click “Exit” above the preview to leave SuperEdit.
When inactive, the top status area shows a horizontally scrollable list of keys and settings. While active, it shows the current setting, step, value, Reset, and Exit, followed by buttons for switching to another setting without leaving SuperEdit. The current setting is omitted from that list; activation keys and availability match the inactive guide. The bar stays one row high. Scroll horizontally or use the arrow buttons to reach more settings. In a narrow area, the current controls scroll with the setting buttons. The step level appears as “1–5: 3”; hover over the current controls for the full instruction.
In Settings → Keyboard → “SuperEdit Key Settings…”, independently enable Esc, an assigned letter key, a left-click, and a right-click as exit methods, then click Apply. Only Esc is enabled by default. The exit letter cannot duplicate an activation key. Click exits apply inside the preview area; toolbar, sidebar, and sheet controls keep their usual behavior. Control-click also counts as a right-click. A click used to exit commits the adjustment without performing an image action or opening a menu. The Exit button remains available even if all exit methods are disabled.
⌥↑ / ⌥↓ switches between available settings. Press plain 0, or click “Reset,” to restore the active setting's default. Text fields and sheets take priority when they have focus.
In Settings → Keyboard → SuperEdit, choose whether to show the toolbar and each sidebar during SuperEdit. All three are hidden by default. The top status area, including the current value, step, and Exit button, stays visible. Switching targets keeps the visibility settings; ending SuperEdit shows the toolbar and both sidebars.
| Default key | Setting | Default key | Setting |
|---|---|---|---|
| E | Exposure | W | Temperature |
| T | Tint | D | Highlights |
| S | Shadows | F | Straighten |
| G | Output sharpening | X | Luminance NR |
| Z | Color NR | C | Contrast |
| A | Saturation | V | Vibrance |
| Q | Clarity | R | Structure |
Whites and Blacks have no default activation keys. Assign letters in app settings → “SuperEdit Key Settings…” and click Apply. Duplicate assignments cannot be saved. Adjustment keys such as the arrows, 0, and 1–5 are fixed. If Y or I is assigned to SuperEdit, that assignment takes priority over the ordinary shortcuts below.
Ordinary display shortcuts: Y switches full-image comparison; I shows metadata; ⌘G toggles the grid; ⌘+ / ⌘− zooms in/out.
Customize step sizes
Open Settings → Keyboard → “SuperEdit Step Sizes…”, enter the five increments for each control, and click Apply. The arrow keys, mouse wheel, and trackpad use the same step sizes.
- Defaults match the previous behavior. Exposure, for example, uses
0.01 / 0.05 / 0.1 / 0.2 / 0.3 EV. - Enter positive numbers in ascending order from 1 to 5. Decimal and equal values are allowed. Invalid fields have a red border and an explanation; Apply becomes available after correction.
- Use “Reset to defaults” on a row to restore that control, or “Reset all to defaults” for all step sizes. Cancel discards the draft.
- Settings are saved for the whole app. Applying finishes any in-progress adjustment and updates the step label and subsequent input. Existing development values are preserved.
- Temperature uses K or relative units depending on the image. The trackpad movement needed to advance one step stays the same.
Browser keys
| Key | Action |
|---|---|
| Space | Switch between large preview and grid |
| Return | Open the selected image in a development window |
| ← / → | Move the selection or previous/next preview image |
| ⌘A | Select all images in the grid |
| Esc | Clear the grid selection or return from preview to the grid |
| 0 | Clear rating |
| 1–5 | Assign star rating |
| P / X / U | Pick / Reject / Unmarked |
0 clears a rating in the browser but resets a setting in SuperEdit. If a text field has focus, input goes to that field instead.
Layers, Masks, and Spot Repair
Local corrections with layers and masks
- Add an adjustment layer from the layer panel.
- Select it and choose a type under “Add mask.”
- Create the mask's area, then change Exposure, color, or another setting in the development panel.
- Turn off the mask overlay to inspect the actual correction.
The red overlay shows the selected area. Creating a mask alone does not change brightness or color; change the layer's correction settings.
An adjustment layer without masks applies to the whole image. If it has masks and you disable all of them, its correction area becomes empty.
A layer's “Amount” controls the strength of its corrections: 100% applies them as configured, and 0% has no effect. Changes apply when you release the slider. An inverse layer corrects the area outside the mask of its referenced adjustment layer.
Choose a mask
| Type | How to use it |
|---|---|
| Color Region | Enable the eyedropper and click to select connected areas of similar color. Select a seed to adjust its threshold |
| Global Color | Use a picked color to select matching areas throughout the image, including disconnected areas |
| Skin Selection Mask | Select connected regions using color-difference angle and distance, without AI |
| Luminance Region | Select a connected luminance range from a clicked point; select the seed to adjust |
| Global Luminance | Select a luminance range throughout the image |
| Linear Gradient | Drag on the image, then adjust direction, width, midpoint, and strength |
| Circle / Ellipse Gradient | Drag diagonally to create an ellipse; adjust size, rotation, midpoint, and strength |
| Brush | Enable “Paint on image,” drag, and release to apply |
| AI Selection Mask | Use “Click image to select” to add or subtract selection points and generate a mask |
The skin-selection circular controller uses rim dots for angle bounds, ↔ to rotate the angle range, and inner/outer dots for distance bounds. Sliders and numeric fields below it stay synchronized. Distance is color difference from the center, not an ordinary saturation percentage.
App settings define the default skin-selection range for new seeds. Adjust existing seeds within their masks. If a clicked color falls outside the defaults, the range expands automatically and may become wider than specified. A similarly colored background may also be selected; check the overlay.
For luminance ranges, inner triangles set the selection range and outer markers set feathering. Drag inside the range to move it as a whole.
The linear gradient's endpoints control direction and width, its center point controls the midpoint, and its connecting line moves the whole gradient. Each of the three points has a separate strength. For an ellipse, drag its center to move it, its boundary to resize it, the rotation handle to change angle, and its intermediate point to set the transition position.
New brushes have “Follow color” on by default. This selects connected areas similar to the brush-center color within the brush's bounds. Threshold controls color tolerance; Feather is not used in this mode. Turn it off for an ordinary circular brush. Processing applies after mouse release.
Brush size, feathering, and strength apply to subsequent strokes. Use “Undo last” or the clear-all control to remove strokes. Turn off “Paint on image” to pan the image.
AI selection requires macOS 27 or later. The model is prepared on first use. Switch between “Add to selection” and “Subtract from selection,” then click the image. Drag point markers to reposition them. macOS 26 cannot generate new selections or edit selection points, but it can display and apply saved mask images.
Combine masks
Multiple masks on a layer are combined in list order. The first enabled mask establishes the initial area.
- Add expands the selection, using the larger strength where areas overlap.
- Subtract removes the mask from the selection accumulated so far.
- Intersect keeps areas selected by both.
“Selected” shows the individual mask; “Combined result” shows the layer's final selection. “Invert combined mask” swaps inside and outside.
For example, select the sky side with a gradient, then add a Global Luminance mask with Intersect. Only the specified luminance range within the gradient is corrected. Order affects the result, so check Combined result while adjusting.
Delete layers with the trash icon on their rows. Base cannot be deleted. Delete masks with their list trash icons; duplicate and move them using nearby controls. Boundary adjustments refine mask edges.
Spot repair
Select Base, use single-image view, and wait for rendering to finish.
- Choose Heal or Copy in the spot-repair panel.
- Enable “Remove spots on image” and click the area to repair once.
- Orange marks the repair destination; light blue marks the automatically placed source. Drag either circle if necessary.
- Use the selected circle's handles for size, feathering, and rotation. Release to inspect the result.
- Delete unwanted repairs with their list trash icons.
Heal blends the source texture into the destination's surrounding color and brightness. Copy transfers its color and texture directly. The click-time size-estimation option estimates the size of dark dust spots; if it cannot identify one, it uses the current size. It does not automatically detect dust across the whole image.
Saving and Reusing Your Edits
Keep editing states
| Method | Use | Retention |
|---|---|---|
| Latest editing state | Reopen the same photo and continue editing | Saved per image in the database |
| Snapshot | Keep a temporary state before trying a different adjustment | Only while that photo is open; lost when closed or reopened |
| Variation | Keep multiple finishes of the same photo | Saved persistently in the database |
| User preset | Apply settings and layers to other photos | Saved as a preset; file import/export is available |
Name a snapshot and save it; select it in the list to restore it.
Variations sit above the management tabs, normally on the right and on the left when panels are swapped. Click “+ Save” to add the current edit with an automatic name. Choose a saved name in the menu to restore it; restoration can be undone. “Modified” indicates changes since saving or restoring.
The “…” menu offers restore, overwrite, rename, delete, and reload. Overwrite and delete require confirmation; deleting a variation leaves the current edit intact. Click the heading to collapse the panel. The toolbar variation button reveals and expands this panel instead of opening a popover. It stays available above the Layers, Metadata, and Color Picker tabs.
Presets sit directly below Variations in the management sidebar. Choose a preset, then click Apply; choosing a name alone does not change the image. The “…” menu provides save, import, export, delete, reload, application mode, settings selection, and layer selection. Click the heading to collapse the panel. The toolbar preset button reveals and expands it. It follows the management sidebar when sides are swapped.
Create presets with “Save current settings.” When applying one in the development window, choose settings and layers, using “Replace selected items” or “Add layer” as appropriate. Check positional masks and repairs on the destination image. AI selections are regenerated there and require a supported OS.
Undo/Redo is editing history, not a substitute for persistent variations. Edits are not guaranteed to follow an image file after moving or renaming it. Storage and backup details are in the persistence reference, currently in Japanese.
Reuse white balance across images
| Source → destination | White balance behavior |
|---|---|
| RAW → RAW | Apply absolute temperature and tint |
| Rendered image → rendered image | Apply temperature and tint correction offsets |
| RAW ↔ rendered image | Keep destination WB and show the reason |
| Old preset without a WB type | Keep destination WB; resave the preset from its source image to include WB |
For example, 5300 K on a 5000 K baseline transfers an offset of +300. A 6000 K destination becomes 6300 K; a destination without recorded temperature receives a relative +300. Each input's limits still apply, and identical appearance is not guaranteed. Other selected settings are applied normally. This rule is shared by development-window presets and browser paste/preset operations.
Resetting a rendered image restores its temperature/tint offsets and NR defaults. It does not add RAW lens correction or RAW source-area controls.
Copy and paste development settings
- Select one source photo with saved settings and click “Copy development settings.”
- If several sources are available, choose “Last saved development settings” or a named variation. The context menu also offers these choices.
- Select one or more destination images and choose “Paste development settings.”
- Choose the settings to include and click “Paste.”
- Wait for completion and inspect the destination thumbnails.
The toolbar command applies to every selected image. From the context menu, right-clicking a selected photo applies to the selection; right-clicking an unselected photo applies only to it. Hidden, unselected members of collapsed stacks are not included. Expand the stack and select all members to include them.
Pasting saves settings and updates thumbnails without opening new development windows. An already open photo receives the settings in its existing window. The targets and copied settings are fixed for the operation. If an image fails, processing continues, then shows success/failure counts and failed filenames.
Pasting changes destination settings, so save a variation first if you want to retain an existing finish. It does not replace the destination image with the source photo. Check mask, crop, and repair positions afterward. AI mask regeneration requires a supported OS. The source photo's RAW source area is not transferred.
Choose which settings to paste
The paste sheet shows the source, target count, and setting checkboxes. Choose Exposure, WB, tone, color/Film Style/LUT, RAW NR/sharpness, local detail controls, rotation/crop, spot repairs, layers/masks, and lens correction. Lens correction is independent of NR. All settings are selected initially.
Unchecked settings keep each destination's current values. Undeveloped photos use input defaults: capture WB/NR/lens correction for RAW, or no added correction for rendered images. Unchecking Layers and Masks preserves existing additional layers and masks; checking it replaces those additional layers with the source's. Selecting NR/sharpness does not change lens correction if its checkbox is off.
Use Select All or Deselect All as needed. Paste is unavailable if nothing is selected. The last selection used for Paste survives app restarts. Cancel leaves development settings unchanged. The source, targets, and folder access are fixed when the sheet opens; setting choices are fixed when processing begins. Successful changes across multiple photos form one Undo/Redo operation.
The browser's “Apply preset…” command applies all preset settings and does not use these paste selections.
Apply a user preset to multiple photos
Select photos and choose “Apply preset…” from the toolbar or context menu. Right-clicking a selected photo targets the whole selection; an unselected photo targets only itself. The sheet shows the target count and warns that current settings will be replaced. If no presets exist, save one in the development window first. The preset library is shared with the development window and refreshed each time the sheet opens.
Photos are processed in sequence and thumbnails updated without opening new development windows. Already open photos use their existing windows. The operation includes geometry, spot repairs, layers, and masks, as with copying all development settings. AI masks are regenerated from destination photos.
Progress and success/failure counts are shown, along with failed filenames and reasons. A failure does not stop subsequent photos, and successful changes remain. The copied settings buffer, original image files, and existing variations are unchanged. Hidden, unselected stack members are not included.
Undo and redo batch changes
Successful browser paste and preset changes are recorded together as one operation. Use toolbar Undo/Redo, the Edit menu, ⌘Z, or ⇧⌘Z. A focused text field uses text-editing Undo instead.
Undo restores each photo's previous settings and layers; Redo restores the applied state. Photos that originally had no saved settings return to that state and original-source thumbnails. This also applies to photos open at capture defaults. If a development window had unsaved edits before the batch operation, those edits are restored as a saved state. Open windows and thumbnails are synchronized.
Progress is shown during restoration. Images that failed during application are not included in its history. If an image file, RAW source area, saved settings, or open development window has changed since the operation, restoration does not overwrite it and reports a failure. Only successfully restored images move to the opposite history; failures can be retried. If a development window opens during rendering, restoration stops for that image and can synchronize with the window on retry.
A new successful batch operation clears Redo history. Browser history is held in memory and does not survive restarting the app. The app's Undo/Redo limit applies as a count of batch operations. Original image files and saved variations are unchanged. Browser history is separate from development-window history; later edits are checked to prevent overwriting them.
Reset development settings in a batch
Choose “Reset Development Settings” from the toolbar or context menu to return current settings, additional layers, and masks to input defaults. A context-menu action on a selected photo targets the selection; on an unselected photo it targets only that photo. Hidden, unselected stack members are not included.
No new development windows open; existing ones are synchronized. Grid thumbnails return to camera previews. Saved variations, user presets, ratings, tags, stacks, and RAW source areas remain. “Reset Thumbnail” resets only the displayed thumbnail, unlike this operation, which removes current saved development settings.
Successful changes form one Undo/Redo operation. Undo restores settings, layers, masks, and developed thumbnails; Redo resets them again. Resetting an image with no saved settings does not add history. Partial failures show filenames and reasons while preserving Undo for successful changes.
Exporting JPEG, PNG, TIFF, and HEIF
Export a developed image
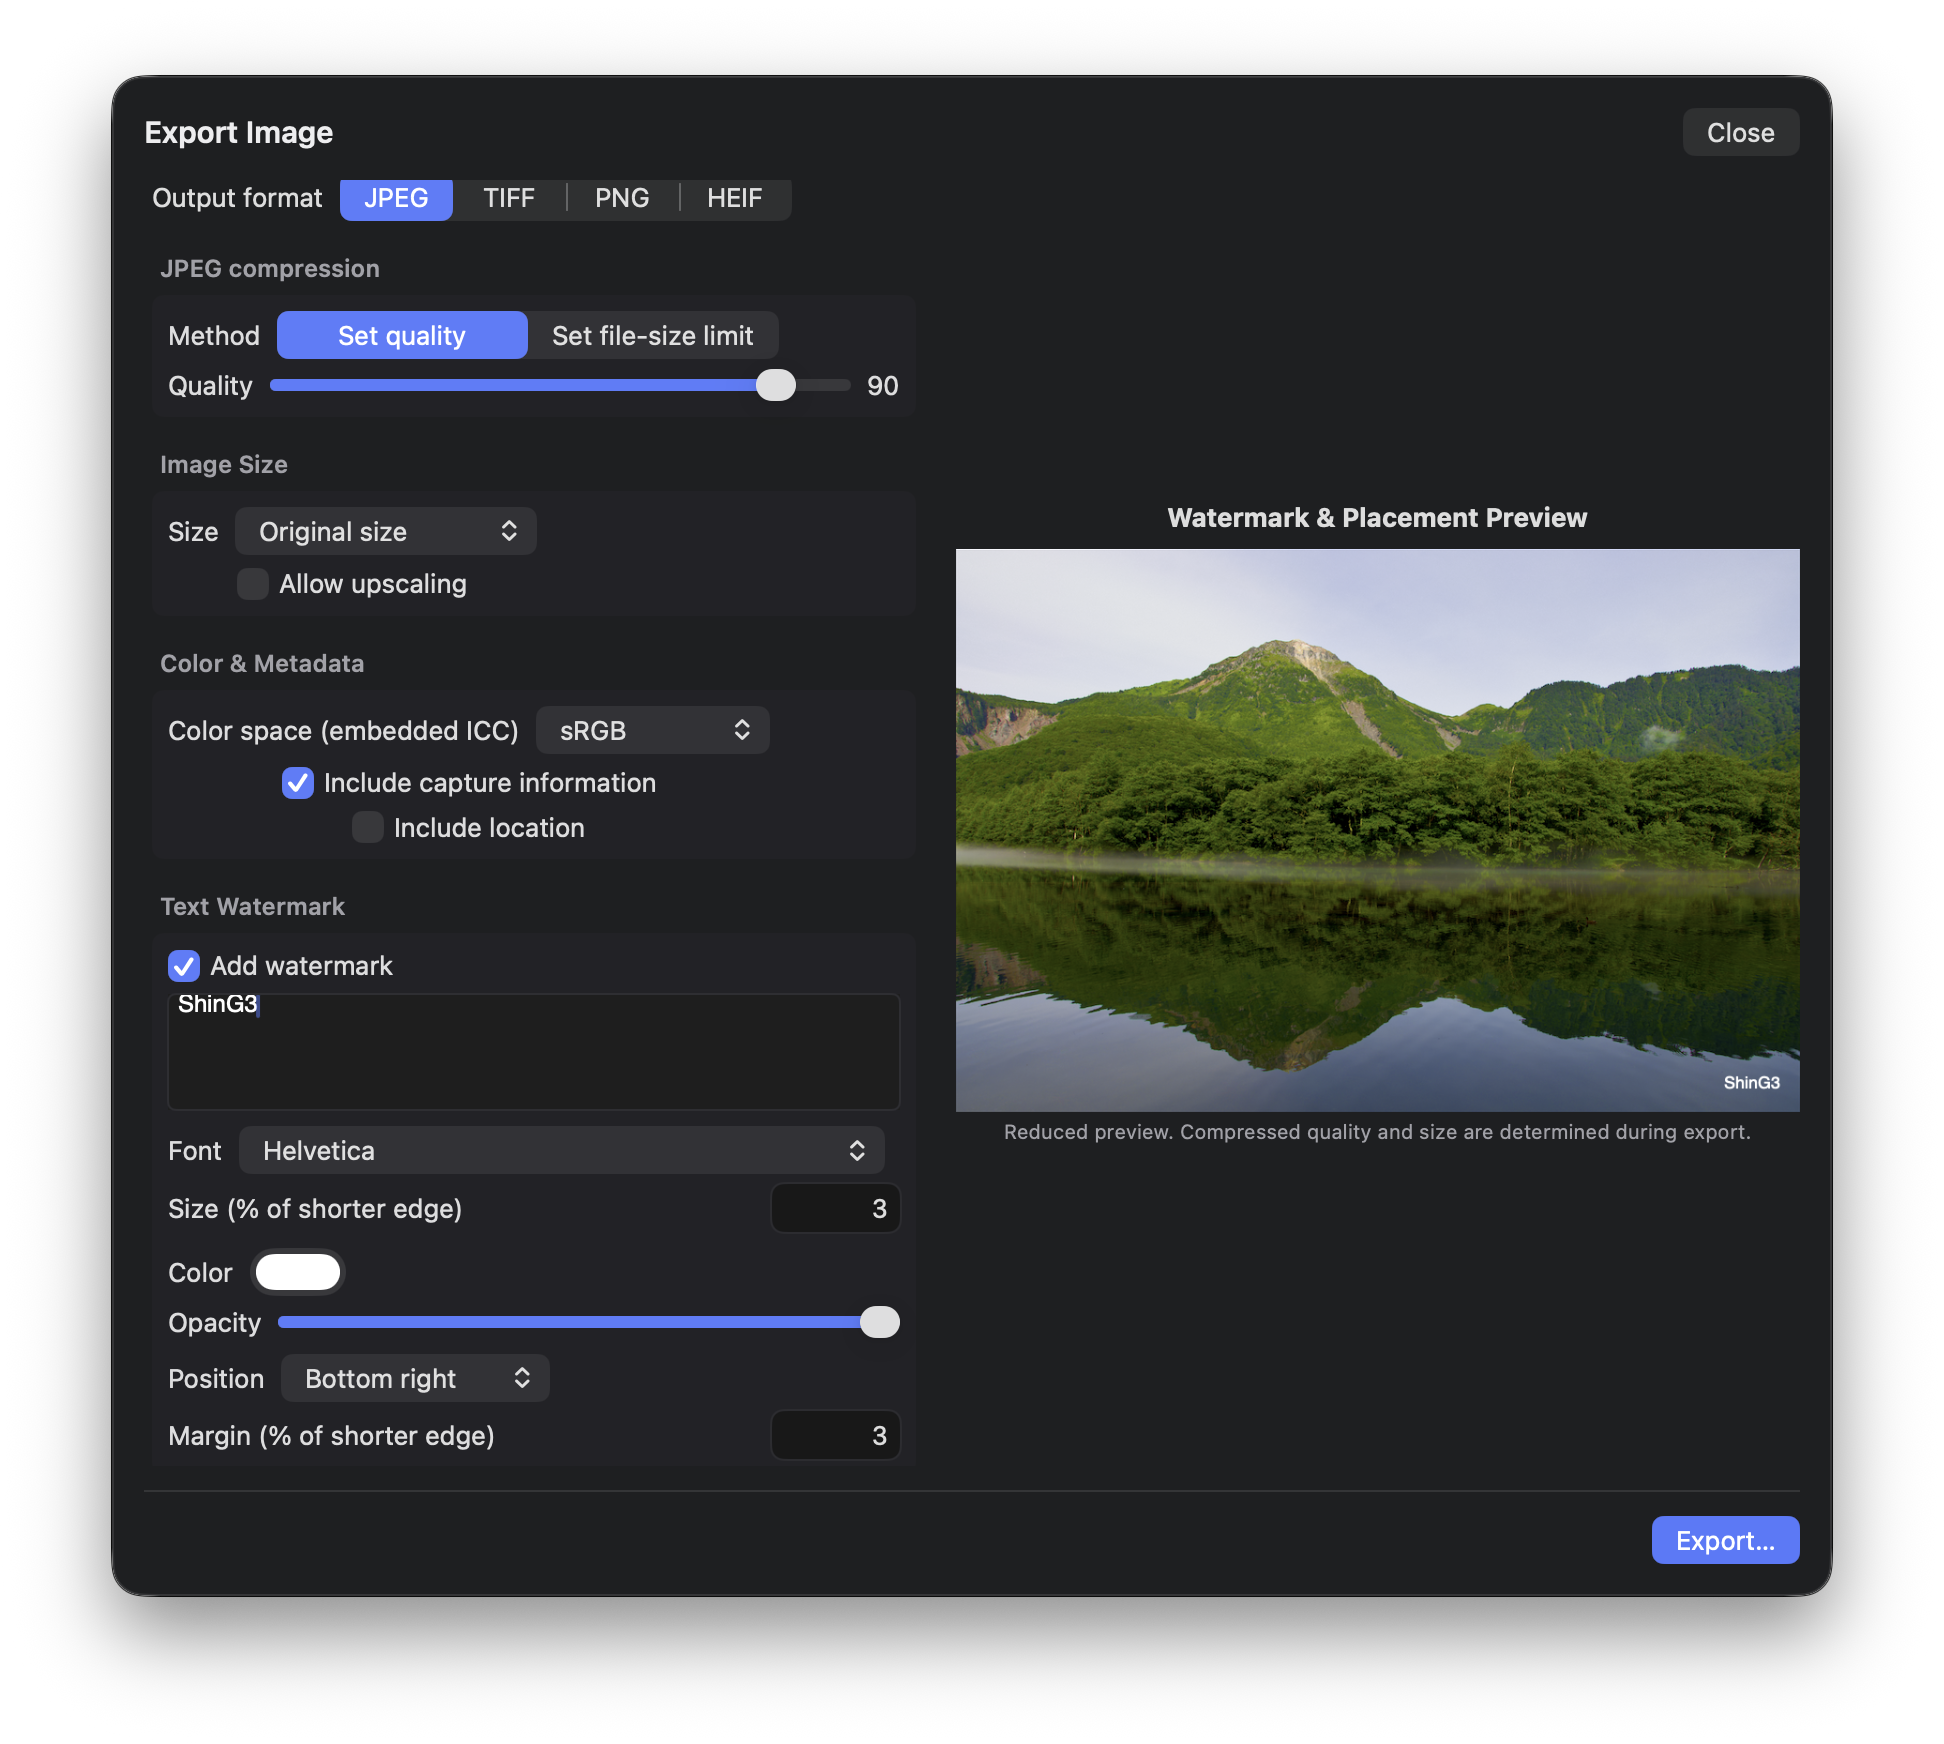
- Open “Export image” from the toolbar.
- Select an export profile and choose JPEG, PNG, TIFF, or HEIF.
- Set output dimensions, color space, metadata, and an optional text watermark.
- For JPEG, choose quality or a file-size limit. For PNG, choose 8 or 16 bits. For TIFF, choose bit depth and compression. For HEIF, choose SDR or HDR (PQ), then quality. SDR allows 8 or 10 bits; PQ requires 10 bits.
- Save frequently used settings as an export profile.
- Click “Export…” and choose a destination and filename in the save dialog. Check the completion message.
One MB in the file-size setting means 1,000,000 bytes. If quality adjustments cannot meet the limit, change the output dimensions or allow resizing. The panel preview is reduced in size; compressed quality and final file size are determined during export.
A text watermark supports text, font, size, color, and placement. Its size and margin are percentages of the output image's shorter side. C2PA signing is not currently supported.
Mask overlays and editing handles are not included in exported images. Check whether filename conflicts use numbering, overwrite, or an error.
Exporting to Photos Library
HDR (PQ) supports file output only. Use SDR output for direct addition to Photos Library.
In the development workspace export panel’s destination section, set Export destination to Photos Library. Choose format, size, color space, metadata/GPS and signature, then click Add to Photos Library. macOS may request permission the first time.
The result is added as a new photo, leaving the original unchanged. Images opened from folders are supported too. The filename uses the original base name, profile suffix and format extension. Repeating the export creates another photo, even with the same name. Destination is not stored in profiles; reopening the panel defaults to File.
Wait for the completion message. The panel cannot be closed or submitted again during export. If access is denied, allow it in System Settings > Privacy & Security > Photos. Import failures display the reason. JPEG/PNG/TIFF/HEIF use the selected export settings; if Photos rejects a format or bit depth, an error is shown without silently converting to another format.
This supports individual exports from the development workspace. Album selection and batch export to Photos Library are not yet supported. iCloud synchronization follows the photo library's settings.
Choose an output format
| Format | Settings |
|---|---|
| JPEG | Quality or file-size limit, with optional resizing to fit |
| PNG | 8/16-bit integer, opaque, lossless compression |
| TIFF | 8/16-bit integer or 32-bit floating point; uncompressed, LZW, or ZIP |
| HEIF | Opaque 8/10-bit SDR or 10-bit HDR (PQ); quality 1–100; .heic extension |
PNG and TIFF do not use JPEG quality or file-size limits. Dimensions and metadata/GPS choices are shared. Normal output supports sRGB/Adobe RGB/Display P3; PQ color space and watermark restrictions are described below.
32-bit TIFF uses the extended range of the chosen color space to retain negative values, values above 1, and float precision, including with a watermark. This is not a dedicated scene-linear output option. It cannot recover information absent from the source or lost during development. The reduced preview's precision differs from the output's. Exported PNG/TIFF files can be reopened in ShinG3Genzo.
HEIF output
Choose HEIF in the common export panel or “HEIFを書き出す…” from the development toolbar. HEIF uses opaque HEVC still images with a .heic extension. SDR is the default and allows 8 or 10 bits per channel (default: 10); HDR (PQ) uses 10 bits. Quality is 1–100. Dimensions, capture metadata, GPS, and collision handling use the common settings and profiles. SDR supports sRGB/Adobe RGB/Display P3 and text watermarks; PQ restrictions are described below. Saved profiles without the new bit-depth field continue to load.
HDR (PQ) can be selected explicitly. Gain maps are not generated. JPEG-only file size limits and automatic shrinking to meet them do not apply to HEIF. Quality values do not imply the same fidelity or size as JPEG. Encoder availability depends on the OS; failure or a silent bit-depth fallback is reported as an error. Exported HEIF images can be reopened in ShinG3Genzo.
Batch export selected images
- Select photos in the browser grid and click “Batch Export…”. No development windows open.
- Select a JPEG/PNG/TIFF/HEIF export profile and adjust quality, dimensions, color space, metadata, or watermark if needed. Profiles are shared with the development window.
- Output names combine the original filename, the profile's filename suffix, and the format extension. Choose numbering, overwrite, or error handling for existing files.
- Click “Export…” and select an output folder. The last export folder is remembered.
- Images are processed one at a time. Progress shows the completed count and current filename. Failures do not stop subsequent photos; the final summary lists successes, failures, and failed images.
Cancellation stops when the current operation can check the request. Encoding may take time to stop. Files already exported are kept. The panel cannot be closed during processing.
Targets are fixed when you open batch export. Hidden, unselected stack members are not added automatically. Settings and RAW source areas are read and fixed when export starts. By default, the last saved settings are used, or input defaults (no added correction for rendered images) for images without saved settings. Unsaved editing states are not exported directly. The right-side preview is a reduced view of the first target.
RAW processing uses full resolution regardless of the preview-speed setting. Purchase/trial eligibility is checked at the start and before each image; the operation stops if eligibility can no longer be confirmed. Saved development settings, thumbnails, and original image files are unchanged.
Batch export is also available in the grid's context menu. Right-clicking a selected image targets the selection; right-clicking an unselected image targets only that photo. It uses the same profiles, progress, and cancellation controls as the toolbar command.
Select a variation for batch export
Under “Development settings,” choose the default “Last saved development settings” or a saved variation name. Available names are collected from selected photos. Each image uses its own settings and layers for that name. Images without the named variation are excluded. Target and excluded counts are shown; export is unavailable with zero targets. The preview shows the first eligible photo and updates when the selection changes.
Variation names must match exactly. If one image has multiple variations with the same name, the first in its saved order is used. Settings are fixed at export start. Images whose selected variation was renamed or deleted before starting are excluded; the completion message includes the actual excluded count. With the default last-saved option, images without saved settings use input defaults.
The variation choice is not saved in an export profile and returns to the default when the panel reopens. Filenames still use the original name, profile suffix, and extension. Exporting every variation at once is not supported.
Exporting HDR (PQ)
In the development workspace or browser batch export panel, choose HEIF, then HDR (PQ) under Dynamic range. RAW files are developed in HDR with the selected editing settings. The RAW HDR preview button does not select the export mode.
PQ output uses 10-bit HEIF with BT.2100 PQ / BT.2020. Text watermarks and file-size limits are unavailable. Selecting PQ disables them and changes the destination to File. Direct PQ export to Photos Library is unsupported. The export panel shows an SDR preview of HDR export, which does not reproduce the final HDR display brightness.
Returning to SDR restores the normal color-space settings. Selecting another file format returns to SDR. SDR remains the default. HDR JPEG and gain-map generation are unsupported. Saving an SDR source as PQ cannot recover highlights already lost from that source.
JPEG, PNG, integer TIFF, and HEIF SDR output use system tone mapping for HDR images. A 32-bit float TIFF retains negative and above-1 values but does not guarantee HDR presentation in other viewers.
Settings, Purchase, and Free Trial
App settings
After changing the display language, quit and reopen ShinG3Genzo. The selected language applies to both the app's controls and the standard menu bar. Follow macOS uses the macOS per-app language setting or preferred languages.
Settings control display language, Undo/Redo history limits of 100–100,000 operations, panel placement, SuperEdit keys, skin-selection defaults, the default RAW source area, and preview speed. Language changes take effect after restarting.
“Reset Development Database…” deletes editing states and variations for all images. Do not use it merely to reset panel layout.
The preview-speed priority setting is on by default. It adjusts processing resolution to the display size and zoom level. Inspect detail at 100%, or turn it off to develop previews at full resolution throughout. Export processes RAW files at full resolution regardless of this setting; output dimensions follow the export settings.
The image-open, export, and LUT-selection dialogs each remember their own last-used folder and restore it after restarting.
Purchase, free trial, and restore
Open “Purchase & License…” from the app menu or settings to check your eligibility and product information.
- The free trial lasts 14 days from activation. There is no automatic charge. The full version is a one-time purchase.
- Viewing, editing, and saving development settings remain available before and after the trial. JPEG/PNG/TIFF/HEIF export requires an active trial or the full version.
- If an existing purchase is not recognized, use Restore Purchases. Reload refreshes eligibility and product information.
- Prices come from the store's product information. If products cannot be loaded, wait and reload.
Troubleshooting
Development window
| Problem | What to check |
|---|---|
| Clicking the image does nothing | Wait for rendering; enable the intended tool; use single-image view; select an appropriate layer |
| Scrolling does not pan | Exit SuperEdit, on-image adjustment, brush painting, or other active image-editing modes |
| A mask does not change the image | Change neutral correction values; check layer amount, enabled states, and the combined mask |
| Noise reduction is unavailable | Check whether the RAW/decoder supports it and select Base |
| A temporary saved state is missing | Snapshots are temporary; use variations for persistent storage |
| A toolbar button or panel is missing | Check toolbar/panel visibility and whether the selected layer supports the setting |
| Export cannot write to a folder | Select the destination again in the save dialog and check the reported error |
If the problem persists, report the image filename and format, steps, selected layer/mask, comparison mode, expected result, and actual result.
Image Browser
| Problem | What to check |
|---|---|
| Images are missing from the grid | Folder, subfolder option, file-format toggles, filename/rating/flag/tag filters, and development-status filter |
| Copy is unavailable | Select exactly one source with saved development settings or variations |
| Paste is unavailable | Copy settings first, select destinations, and wait for any current operation to finish |
| Two-image comparison is unavailable | Select two images |
| Stack members do not receive pasted settings | Expand the stack and select its hidden members |
| The field of view differs | RAW source-area badges/menus, crop, straightening, and lens correction |
| Space or rating keys do not respond | Move focus from a search/text field to the grid or preview |
| A favorite folder cannot open | Drive connection, folder moves/renames, and access permissions |
Edit-to-render timing
The bottom-left area, beside Generation, shows a duration such as “Edit→Render 123.4 ms (G42)” after editing. G42 identifies the measured editing generation. During processing, the last completed duration remains. Initial loading alone does not show a value.
For ordinary parameter changes, timing starts just before the value is set and ends at the working image's GPU-render completion notification. It includes development and waiting, but excludes histogram updates and the display's actual scanout/synchronization time. Other edits start timing at the rebuild request.
In comparison views, the measurement follows the working image, not the comparison source. Dropped generations, failed renders, and zoom/pan redraws of the same generation do not add a new duration. During overlapping edits, the requested generation may differ from the measured one; check the G number.
Supported cameras and AI selection
RAW support depends on macOS and the RAW decoder. Check your camera in the app's supported-camera list.
Generating new AI selection masks and editing their points requires macOS 27 or later. macOS 26 can display and apply saved mask images.
Rendered-image input and WB notices
Alpha PNGs are unsupported even when every pixel is opaque. Use an RGB image without an alpha channel. TIFF must be single-page RGB at 8/16-bit integer or 32-bit float; an alpha plane is allowed only if all pixels are opaque. Transparent artwork and HDR display for PNG or floating-point TIFF are not supported. Gain-map JPEG/HEIF and PQ/HLG HEIF support HDR; see HDR development for details.
Relative WB means no valid recorded Kelvin baseline was found. When copying between RAW and rendered images, or using old presets without a WB type, destination WB is kept and a reason is shown. Other selected settings still apply.